Last Updated 07/20/2018
Cashier Upload File
The upload process imports the data into the general ledger system for workflow approval and posting. The necessary process change is due to the integration of the SAP BUworks system with the new Cashier Services system (NelNet).
It provides an efficient streamline process for entering, approving and posting cashier entries in the University’s accounting system (BUworks WebGUI ECC system).
The new process benefits both Administrators and Cashier Services by eliminating the use of Legacy accounting codes (ACK) and providing the user with the means to initiate and track deposits and or petty cash transactions entries.
The Cashier Upload (Journal Entry) Process
The following sections describe the cashier upload process, review the instructions and template files, and talk about the required roles and the WebGUI ECC system transaction code (ZCashUpload) used to upload these entries.
Cashier Upload Access, Template and Instructions - Step 1
Description: We will go over what roles are required and how to access the template and instructions to upload the cashier entries.
Prerequisite: The cashier submitter decentralized (e.fi.cashier_submitter) and department submitter decentralized roles (e.fi.department_submitter) are required to access the SAP transaction code ZCASHUPLOAD.
To request for these role(s), contact your Supervisor and DSA (Data Security Administrator). For more information on DSA go here; /tech/support/information-security/docs/dsaanddatatrustee/.
Step 1
- First, download the Cashier Upload Template Instructions and following the instructions.
- Next, select the appropriate template that resembles the type of Cashier upload transaction (i.e., CCV transaction type – Bank of America checks and cash deposit, Chase checks and cash deposit, Charles River Campus Petty Cash Replenishment, Metro Credit Union Deposit, Medical Campus Petty Cash Replenishment etc.)
- Download the file by clicking on one of the Excel template links below.
Step 1.1 – Download the Cashier Upload Instructions.
Click on this link to download instructions: Cashier Upload Template Instructions
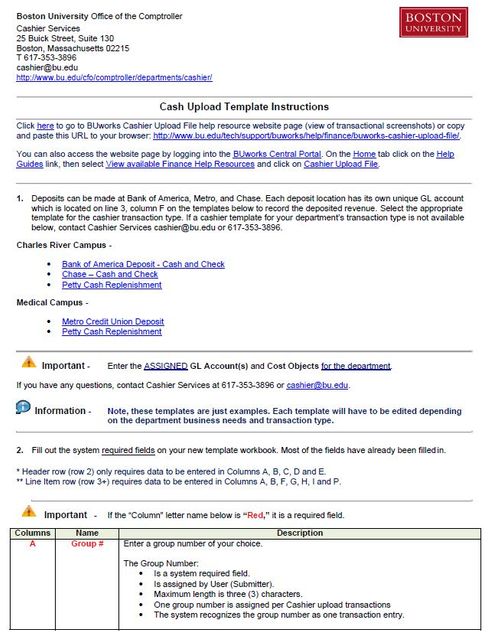
A screen print of page 1 of instructions PDF document.
Step 1.2 – Select the appropriate template to work on. Click on one of the cashier transaction templates links below.
Step 1.3 – Downloaded the appropriate Cashier Upload Excel file template.
Here are example Excel worksheet layouts templates to help you create and complete the process.
Charles River Campus
Medical Campus
![]() Important Information:
Important Information:
- The Excel templates are sample guides to help a user through the upload process. Each template will need to be edited depending on the business needs and cashier transaction type.
- Be sure to enter the ASSIGNED GL Account(s) and Cost Objects for your department.
- Most of the cells have been pre-filled with the appropriate information.
- Once the template is set up, it can be used as a base for future cashier upload transactions.
- Make sure to replace the Cost Objects on the file to reflect “your department’s“ assigned Cost Objects.
- Cost Objects consist of SAP GL Account, Cost Center, Internal Order, WBS Element, Fund, Grant and Business Area.
- Petty cash upload files must:
- Include the department’s “Fund” number. Locate the row (line item area) where GL Account 100100 is listed, enter the Fund number in “column M”of the Excel worksheet.
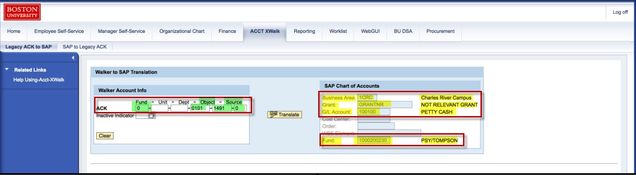
- To search for a department’s Fund number, locate the Petty Cash legacy account codes.
- Use the ACCT XWalk tool to translate the legacy account to SAP Cost Objects and Master Data.
- UIS/Galaxy/Walker is the University’s legacy system sub-tab to complete this task; see screen shot below.
- UIS/Galaxy/Walker is the University’s legacy system sub-tab to complete this task; see screen shot below.
- Include the department’s “Fund” number. Locate the row (line item area) where GL Account 100100 is listed, enter the Fund number in “column M”of the Excel worksheet.
-
- Refer to the acceptable GL Account for expended petty cash entries. A list of appropriate GL Accounts is available here: GL Accounts for Petty Cash upload entry.
- Complete a Petty Cash Replenishment Form to replenish your cash box. To access the PDF form click here.
- Note, Medical Campus petty cash accounts do not require a petty cash replenishment form to be completed.
For questions contact Cashier Services at 617-353-3896 or cashier@bu.edu for help.
For more information about Cashier Services go here to access their website page.
You are now ready to enter data on the required Excel sheet to upload the file into the system.
Proceed to Step 2
Click on the section below “Create the cashier upload file” for Step 2
Create the cashier upload file - Steps 2 & 3
Description: This section reviews how to prepare and create the upload file.
Prerequisites: 1.) The assigned GL Accounts, Cost Objects and Fund for the department is known. 2.) The instructions were read and Excel worksheet template was downloaded and completed.
![]() Important Information:
Important Information:
- If you have not done so, select and download the appropriate “Excel” template file.
- Use your assigned GL Accounts and Cost Objects to prepare the upload file.
- Cashier Services can also assist with questions on department’s assigned GL Account and Fund number.
For help on how to set up a template, contact Cashier Services at 617-353-3896 or cashier@bu.edu.
Click on this link to access the Excel templates.
Step 2
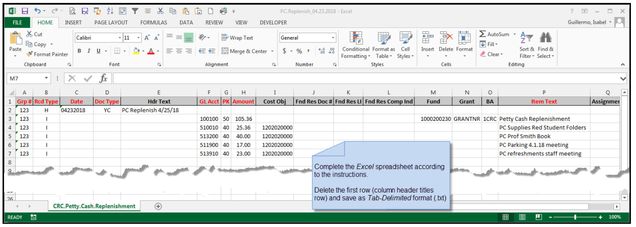
- Use the selected Excel spreadsheet to record the cashier deposit or petty cash entry into SAP WebGUI ECC system.
- Enter the required data in the appropriate Excel cells to initiate that upload file process. Many of the cells have been pre-filled.
The example below is the results of entering the necessary on the Excel worksheet:
Remember:
- To add the required data to the worksheet; do not copy the accounts on the templates.
- To review & confirm the information entered is in the correct column row & cell format.
Step 3
- Once the required data is entered into the spreadsheet, save and name the Excel file.
- Then, delete the first row (column titles) from the worksheet.
- Next, converted the Excel file into a tab-delimited text file (.txt), then saved to your local drive.
It is recommend you save the file in Excel format:
- To use as a guide for the next time you need to deposit funds or replenish your petty cash.
- To make corrections, edits, or changes.
Step 3.1 – Name and save the Excel file to your local drive.
- Next, delete row 1 of save Excel file, then go to File tab and click Save As, add a file name and select tab delimited text (.txt) file format type.
Remember to delete unnecessary rows from the spreadsheet, to avoid unnecessary system messages. Delete the column title row “row 1” and any rows below the entered cells.
The results of converting the Excel file to a Tab Delimited text (.txt) file is displayed below:
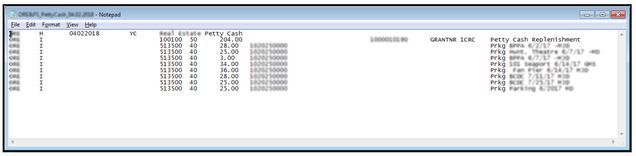
You are now ready to upload the tab delimited file in WebGUI, ECC system using transaction code ZCashUpload.
Note: The cashier submitter (e.fi_cashier_submitter) and department submitter roles (e.fi.department_submitter) are required to perform the next task.
Upload the cashier file using ZCashUpload transaction code - Step 4
Description: In this section below, we will go over how to access the WebGUI ECC system transaction code ZCashUpload. The SAP transaction code is used to upload the tab-delimited (.txt) file you created.
Menu Path: BUworks Central Portal –> WebGUI tab –> ECC system –> Cashier Submitted Distributed role –> ZCASHUPLOAD – JV Upload for SAP transactions
Step 4
- Go to WebGUI tab and click on ECC system to access your role and transaction code ZCashUpload. Upload the tab-delimited file for the system to assigned a document number.
The following steps below, illustrates how the file is uploaded into BUworks SAP WebGUI ECC system.
![]() Important Information:
Important Information:
The cashier submitter (e.fi_cashier_submitter) and department submitter roles (e.fi.department_submitter) are required to access this transaction code and perform this task.
To request this role(s), contact your Supervisor and DSA (Data Security Administrator). For more information go here; /tech/support/information-security/docs/dsaanddatatrustee/.
- Access your role (Cashier Submitter folder), open the folder (click on arrow) and click on transaction code ZCASHUPLOAD.
- You can also enter the transaction code in the Command Bar.

*If you’re unable to access the transaction code to perform the task, more than likely you don’t have one of the two roles required. You will not be able to perform the task without both roles.
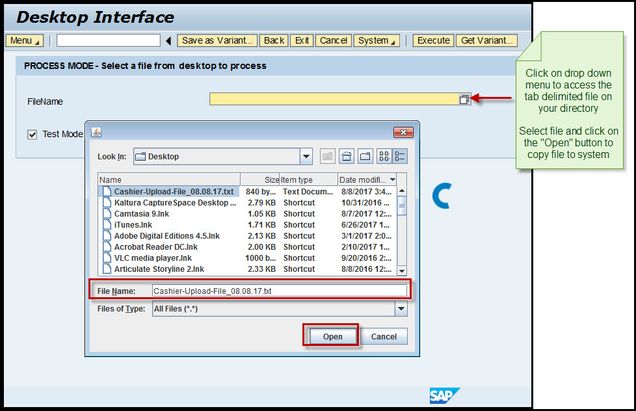
- Click on the Drop Down Menu in the FileName field, to locate, select and upload (import) the file into the general ledger system.

- Highlight and select the file by clicking on Open button.
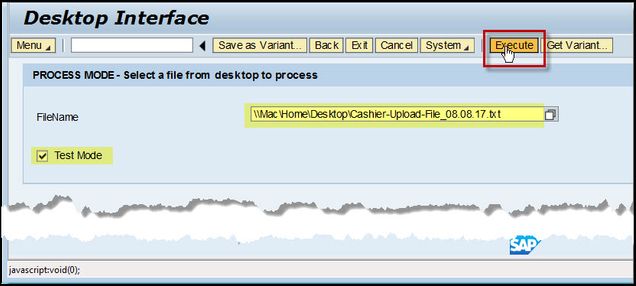
- Confirm that the “Test Mode” box is checked off, then hit the Execute button to import (upload) the file.
- Execute (run) the program in “Test Mode” first, to validate the file format and master data entered.
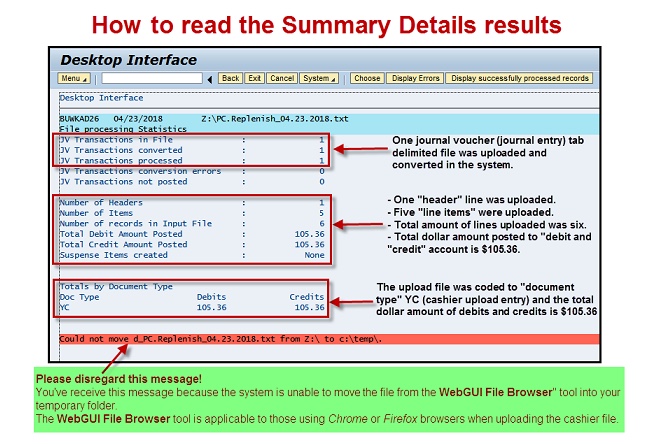
- A window with test results summary will appear. The “JV Transactions conversion errors” line should read “0” zero, indicating no errors detected.
Review the system message results, either one of these two examples will happen:
- If the results contain errors, access the “error” file to address and correct errors. You can also click on the “Display Errors” button to view error results. Then resubmit again, in “Test Mode” to validate the file.
- If the results show no errors, you are ready to process the upload file to initiate workflow approval
Example 1 is the results of system error message. Try to decipher the system message, correct the Excel file by adding the necessary data to the file. screen print below,
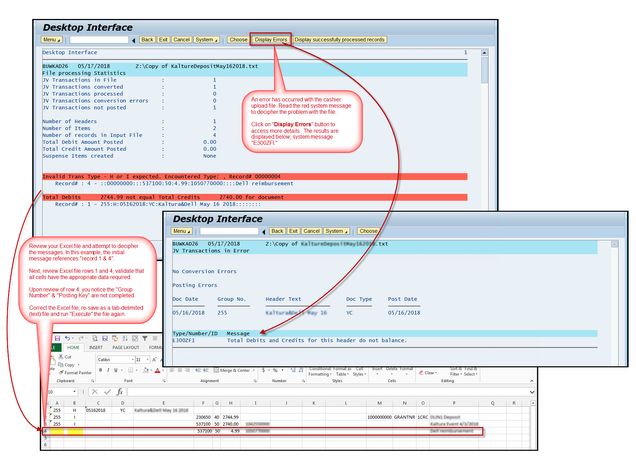
Example 1 of red system error message.
Example 2 – screen print below, the system results in no errors:
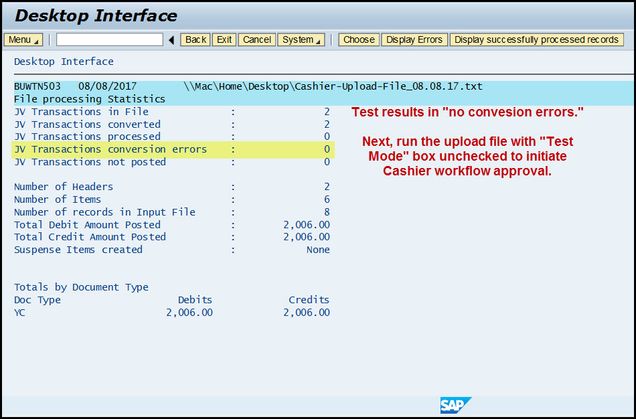
Example 2 results of no system error message.
After you’ve updated the Excel file. Save as a tab-delimited file and run (Execute) the file again. The file is ready to upload to start the cashier workflow approval process.
- Click the Back button to return to the previous menu.
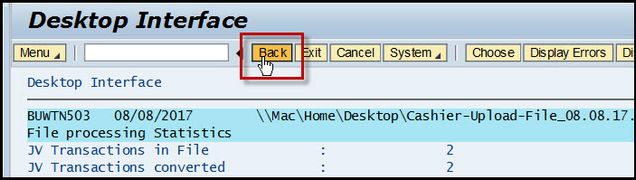
- Uncheck the Test Mode box and click on the Execute button to initiate workflow approval.

- A system message will display the results of the uploaded entries. If you are using Firefox or Chrome browser you may get another red system message. See screen print below:
You have uploaded the tab-delimited file and are ready to view the successfully uploaded entries.
The cashier file upload triggers a SAP document number to generate.
- A email notification is sent to the submitter. The notices displays the summary details as well as the document number assigned to the entry. The email notification will appear with a subject line that reads “Interface batch response for DSKTOP.”
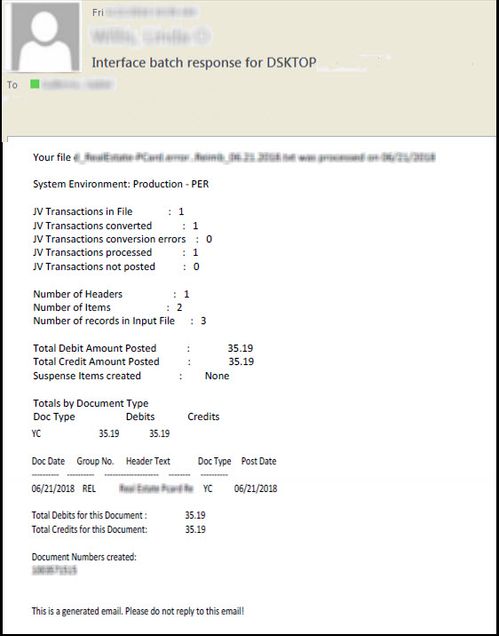
Example of email notification sent to the cashier submitter once the file is uploaded (ZCashUpload).
Follow the instructions on the next section (Step 5) to finalize the task.
View, Display Successfully Processed Records and Print Assigned Document Entry - Step 5
Description: We will review how to view, display and print the cashier upload entry, the last step in the process.
Process Information: In this example, a file was uploaded, processed and is parked awaiting approval. The cashier submitter receives an email notification with the assigned document number and the transaction upload summary . Note, there may be a delay in receiving the email notification. Clicking on the “Display successfully processed records” button will display the SAP document number. The Cashier Approver(s) will also receive a notification via their Worklist tab for approval. Cashier Services will not approve the entry for posting until they receive and review the supporting documentation.
Step 5
Next steps:
- Display successful transaction entries.
- Print a copy of the uploaded cashier document entry.
- Attach all of your supporting documents.
- Forward or walk paperwork to Cashier Services window, Bank of America Bank, or Metro Credit Union.
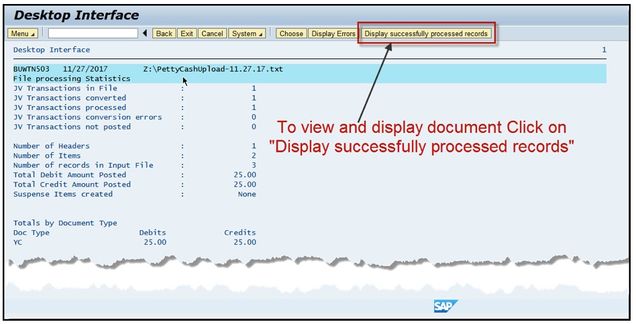
Step 5.1 – Display successfully transaction entries
- Click on “Display successfully processed records” button to view the uploaded entry. You can also scroll down on the “Desktop Interface” window to view the information.
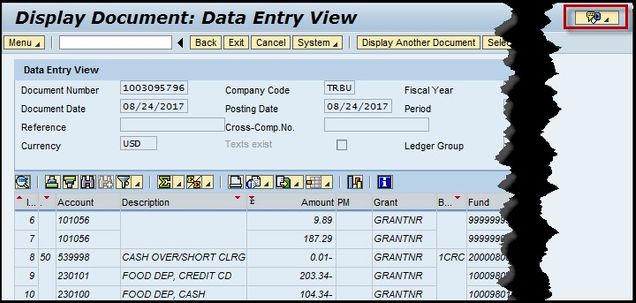
- To view the entry, click on the Magnifying Glass Icon next to the Document Number created title, to get to the “Display Parked Document: Overview” window.
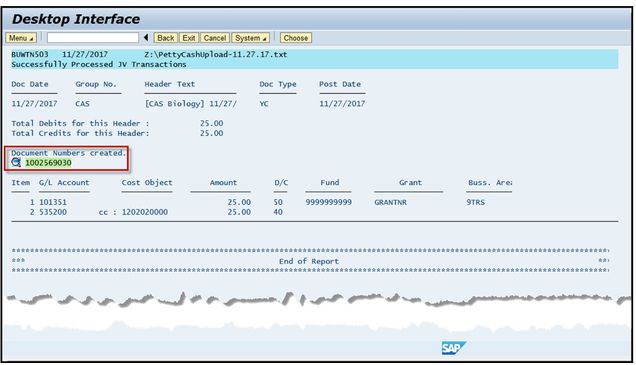
- The new window will display. The Display Parked Document: Overview window shows header and line item information from the uploaded file.
- Go to Menu button, highlight Document and double click on Print Preview to display the document entry print view.
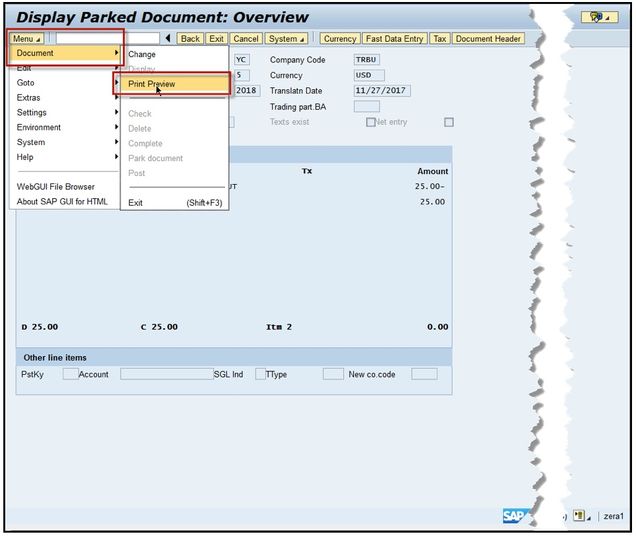
ZCashUpload go to Menu, Document and click on Print Preview to view entry.
- The results is the Document Overview – Display window.
You may need to optimize the width length on the column print view.
To do this, go to Menu, highlight Setting and Columns and select Optimize width.

Screen shot of ZCashUpload display document overview window
You have successfully displayed and set up the print-out view required for Cashier Services to approve.
Step 5.2 – Print a copy of the uploaded cashier document entry.
- Use your internet browser print option to print the cashier transaction entry.
You have successfully printed a copy of the process upload file; cashier upload document.
- Click the Back button to return to the initial ZCashUpload transaction screen window or type “/N” on the command bar to return to your User Menu.
 Do Not Hit the Execute button again, you will Duplicate the entry!
- Click the Back button again to return to your User Menu. Only follow this task if you did not use the navigation tool “/N” on the command bar to return to your user menu.
Next Steps . . . .
Step 5.3 – Attach all of your supporting documents.
- Gather your supporting documents and attached to the print out.
- Examples of supporting documents are cash, checks, petty cash voucher slip, subject payment log, receipts or missing receipt form.
- If necessary (only CRC), complete the Petty Cash Replenishment Form; access a PDF copy of the form here.
- Medical Campus (BUMC) petty cash accounts do not require the petty cash replenishment form to be completed.
- Scan the signed subject payment log, petty cash voucher slips, missing receipt form (if applicable) and the printed copy of SAP document entry, then email copies to cashier@bu.edu.
- Cashier Services will send an email when the cash is ready to be picked up at the Metro Credit Union.
- Do not go to the Metro Credit Union prior to receiving the email.
Step 5.4
- Forward or walk the documents to Bank of America, Chase or Metro Credit Union for the next steps to be completed; Cashier staff review and approval.
You have successfully printed your uploaded entry, attached any support documentation and are ready to forward or walk over packet to Cashier Services for review and approval.
Additional Information:
If you are making a deposit to a Bank of America or Metro Credit Union bank directly, please bring the printed copy of the SAP document entry with the cash and/or checks.
When replenishing Petty Cash at the Cashier Services window, expect to wait 5 – 10 minutes to replenish your cash box. Note, the cashier upload entry will remain parked until Cashier Services reviews and approves the entry in their Worklist queue.
If you need to speak to a Cashier Services staff, their contact information is 617-353-3896 or cashier@bu.edu.
Click here for more information on Cashier Services. Frequently asked questions can be access here.
Displaying a Cashier Upload Entry – FBV3
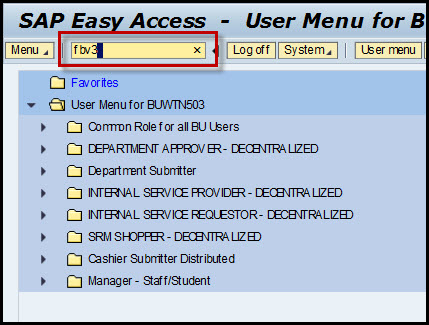
In the following sections, we will review how to display a cashier upload entry in the WebGUI ECC system using transaction code FBV3 – Display Parked Document.
Menu Path: BUworks Central Portal –> WebGUI tab –> ECC system –> Department Submitted Distributed role –> FBV3 – Display Parked Document
Display Cashier Entry Transaction
- Use transaction code FBV3 – Display Parked Document to change a cashier file entry.
ZCashUplaod-Display.Cashier.Entry1-FBV3_C1.1.1
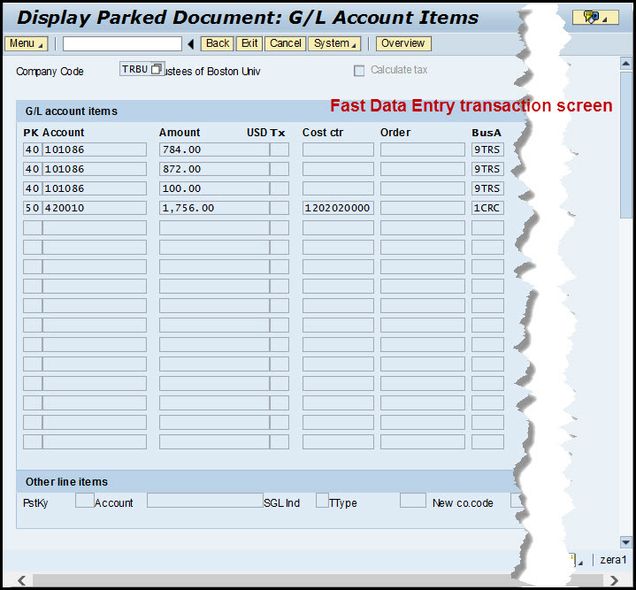
- The Display Parked Document: Overview window will appear.
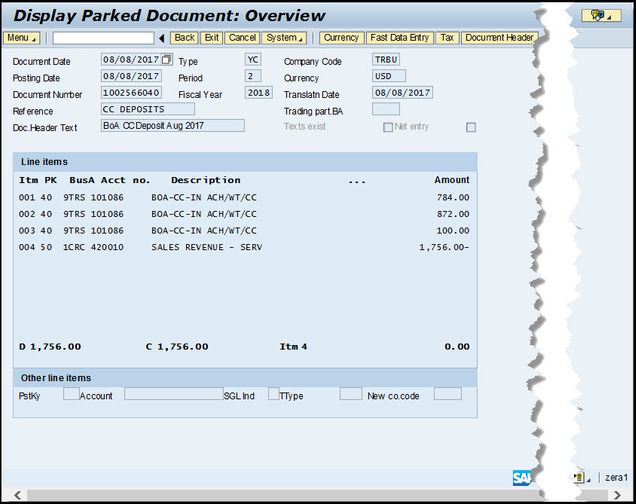
- Click on Fast Data Entry button to display additional Cost Object (Cost Center, Internal Order or WBS Element) information.
- To get to Document Header information go to Menu button, highlight Goto and click on Document header.
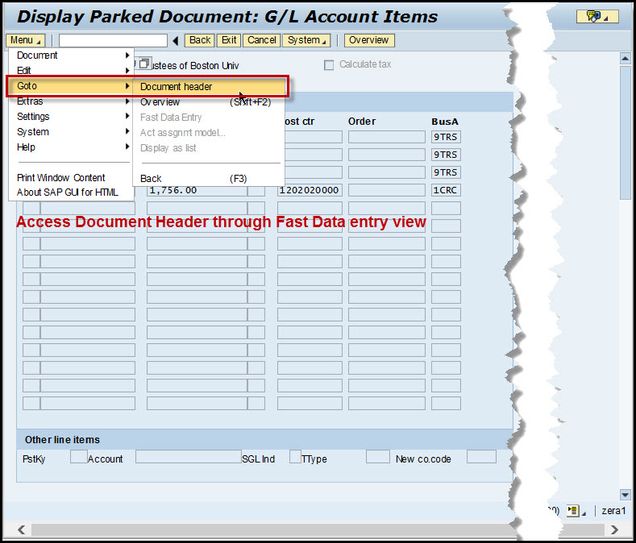
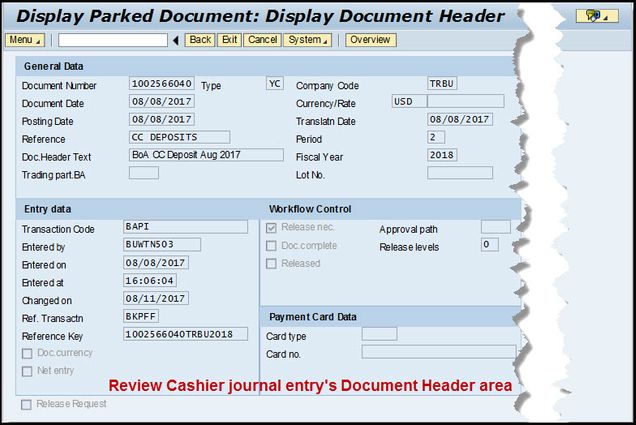
- The document header information provides additional information such as Entry date, Entered by, and system date stamp.
You have displayed the cashier entry.
Review Cashier Workflow Status Using Service for Object Function
Description: This section reviews how to check the status of Workflow; locate the Cashier Approver(s) who’s received the entry to approve on their Worklist.
- To see who’s on queue to approve the entry click on Service for Object and select Workflow Overview.
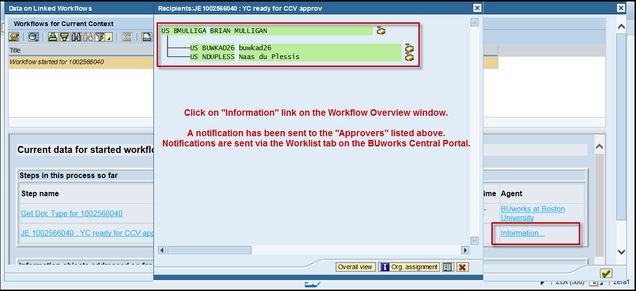
- Click on the “Information” link to display approvers who’ve received the notification via their Worklist.
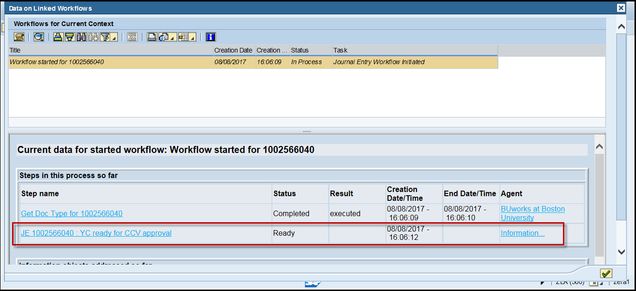
- A new window displays approver’s name and user id.
- Reminder: the Cashier Approver will not approve the entry without the necessary entry print-out and supporting documents.
- You will need to attach the printed document with your backup documentation and forward or walk over to the Cashier Services office located at 881 Commonwealth Ave, Lower Level, Boston, MA 02215.
You have successfully displayed cashier approvers.