Managing Submissions
For Blackboard:
- Launch the Gradescope assignment you’d like to grade. To do that from your Blackboard course homepage, click Tools (Original) or View course & institution tools (Ultra), and then click Gradescope. When Gradescope launches, click your course and then the assignment.
- When your assignment is open, expand Gradescope’s left sidebar (if it isn’t already), and click Grade Submissions.
- Once you do that, the process for grading is the same for Blackboard and non-Blackboard Gradescope users.
For Sakai:
- Launch the Gradescope assignment you’d like to grade. To do that, log in to Sakai, click your course, and then click Gradescope in the left sidebar. Once Gradescope launches, click your assignment. Alternatively, if you created a direct assignment link on your Lessons page in Sakai, click that link to be taken directly to the assignment in Gradescope.
- When your assignment is open, expand Gradescope’s left sidebar (if it isn’t already), and click Grade Submissions to start grading.
- Once you do that, the process for grading is the same for Sakai and non-Sakai Gradescope users.
Auto-matching submissions to names
For instructor-submitted assignments, as soon as submissions are created on the Manage Scans page, we will automatically attempt to match each submission to a student in your roster, using the Name and ID regions that you set up in the Edit Outline step. While we can attempt to match with only one region, using both Name and ID regions will achieve the best results. For the best results, students’ names and IDs should exactly match the names and IDs on your roster and should be handwritten (not typed).
If you ever don’t want students’ names to appear in the grading interface, you can also choose to skip submission matching until grading is complete and label the name and ID regions on the Edit Outline page at a later time.
In the upper left corner of the Manage Submissions page, you can see the total number of submissions and the number of students in your roster who don’t have assigned submissions.
You can click on the “Unassigned” tab in the upper right corner to view any submissions that could not be confidently matched. For these submissions, click on Enter Student Name, type in the name or ID of the student (or just a few letters with auto-complete), hit Tab (rather than Enter) to select the user, and repeat until there are no more unassigned submissions.
Note that adjusting the location of the name or ID regions on the Edit Outline page will re-run the automatic matching on all submissions. Any manually matched submissions will not be overwritten. If you’d ever like to turn off automatic roster matching and match all students manually, you can do so at the top of the Manage Submissions page.
Replacing and deleting submissions
If you would like to replace or delete a specific student’s submission, hover over their name on the Manage Submissions page and click Show Details. The options to delete or replace the submission will appear beneath the student’s name. Replacing a PDF will not delete any grading progress on that submission. You can also upload a new scanned submission on the Manage Submissions page, by clicking Upload Submission in the bottom action bar.
Downloading a student’s submission
If you’d like to download and export an individual student’s submission, first open their submission by clicking on their name on the Manage Submissions page. Once their submission appears on your screen, click Download Original in the action bar along the bottom of your screen. You can also view the student’s submission history by clicking the Submission History button (bottom of your screen).
Adding and deleting group members
If group submission is enabled, you can also add or delete group members from the Manage Submissions page. Group submissions will show multiple students’ names listed next to a submission on the Manage Submissions page. Click the group of students to take you to their submitted work. Once the submission comes up, click the Group Members button at the bottom of your screen. This will pull up a dialog box that will allow you to add students to or remove them from the group submission.
Matching questions to submission pages on students’ behalf
When a student submits a PDF to a variable-length assignment, Gradescope will ask them to indicate which pages their answers to each question appear on in the submitted file. However, Gradescope still allows students to submit work if they haven’t matched each question to a page in their PDF. Gradescope is configured this way to make sure students can turn in work even if they haven’t finished the assignment and therefore can’t assign questions to pages. You’ll know a student turned in a PDF without assigning their questions to pages if you see an error message on your screen when you open their submission to grade it. If that’s the case, you can assign pages for them on the Manage Submissions page.
- First, navigate to the Manage Submissions page. To do that, open the assignment in your course and click Manage Submissions in the left sidebar.
- On the Manage Submissions page, click the relevant submission to open it. Once it loads, click the Reselect Pages button in the bottom action bar.
- Next, you will see a list of the questions/problems in the assignment and thumbnails of the student’s PDF page(s). For each question, click the question on the left and the PDF page(s) that contains the answers on the right.
- You can use the SHIFT key to select multiple questions at a time. You can assign multiple questions to the same page and multiple pages to one question. If each question is on its own page in the student’s PDF, use the Assign Pages Sequentially button in the bottom action bar to quickly assign these pages.
- Click Submit when you’re finished.
Submitting work on students’ behalf
- First, navigate to the Manage Submissions page for the relevant assignment. To do that, open the assignment in your course and click Manage Submissions in the left sidebar.
- On the Manage Submissions page, click the Upload Submission button (or the New Submission button for Online Assignments) at the bottom of the screen.
- Follow the next step based on the type of assignment you’re submitting:
- Homework, Exams, Bubble Sheets, and Programming Assignments: When the dialog box comes up, select your student’s name (optional for Programming Assignments). Then, choose their file or code repository and click the Submit or Upload button. If this is a variable-length PDF homework assignment or exam, select what page of the PDF the answer to each question appears on. Then, click Submit.
- Online Assignments: When the student view of the assignment appears, select your student’s name from the dropdown at the top of your screen. Then, enter their responses or upload their files to the appropriate questions, making sure to click Submit Answer after each. If your student had existing responses that you did not touch, those will be preserved.
Submitting a PDF for a Student
No matter the assignment type or initial assignment settings, you can upload submissions to Gradescope on behalf of your students at any time. Below are the general steps for doing that. You can also find extended steps and more information in the Manage Submissions section above.
- Open your assignment and navigate to your Manage Submissions page from your left side panel.
- Click the Upload Submission button (or the New Submission button for Online Assignments) at the bottom of the screen.
- For Homework, Exams, Bubble Sheets, and Programming Assignments, you’ll then see a dialog box where you can select your student’s name and upload their file or connect to a repository. For Online Assignments, you’ll be taken to a student view of the assignment where you can enter your student’s responses and upload their files to the appropriate questions. Any existing responses you do not change or add in an Online Assignment will be preserved.
Please note that if you want to bulk-upload work to Gradescope on behalf of all of your students, you may want to create an instructor-uploaded assignment instead.
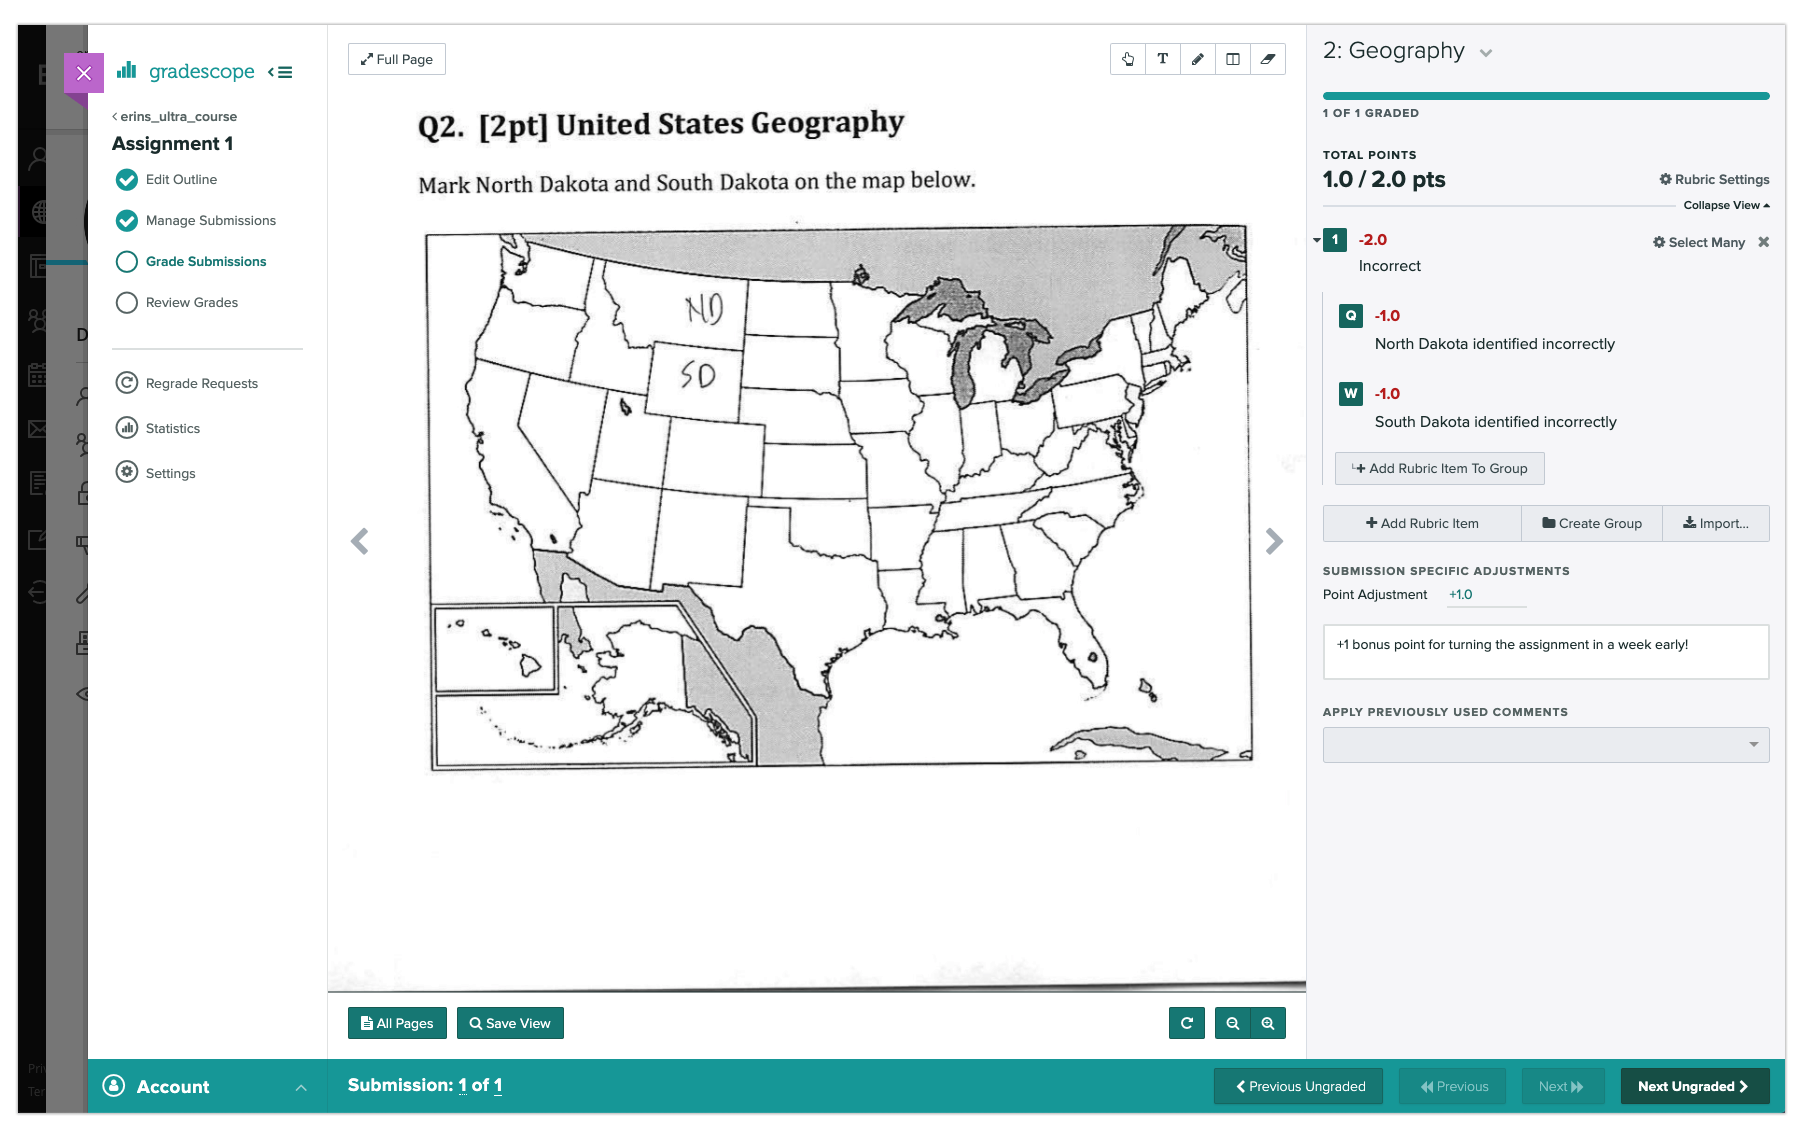
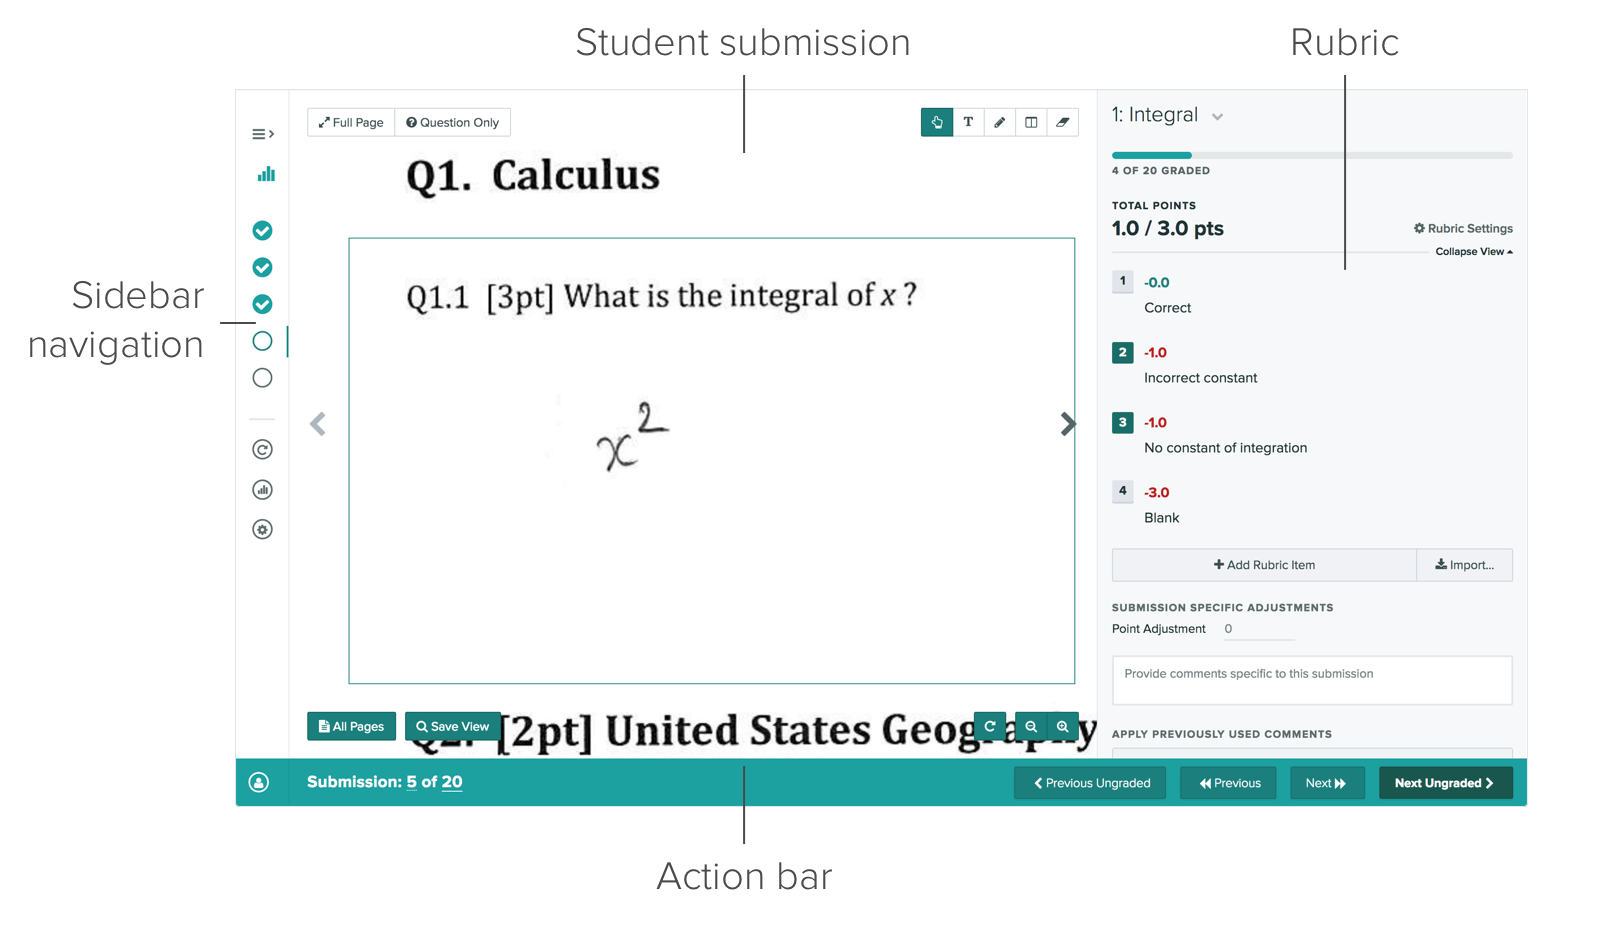
Grading a Question
To begin grading, go to the Grade Submissions tab and click on the question that you would like to grade. There are three core components to the grading page. They are the student submission area, the rubric, and the bottom action bar.
Rubric basics
Grading a submission is as simple as clicking on a rubric item (the box with a number in it) or pressing the number on your keyboard corresponding to the rubric item. At least one rubric item must be applied for a question submission to be considered as graded. To move to another submission, click Next Ungraded to be taken to another student’s submission for the same question. Moving to the Next Ungraded submission avoids more than one person grading the same submission at the same time.
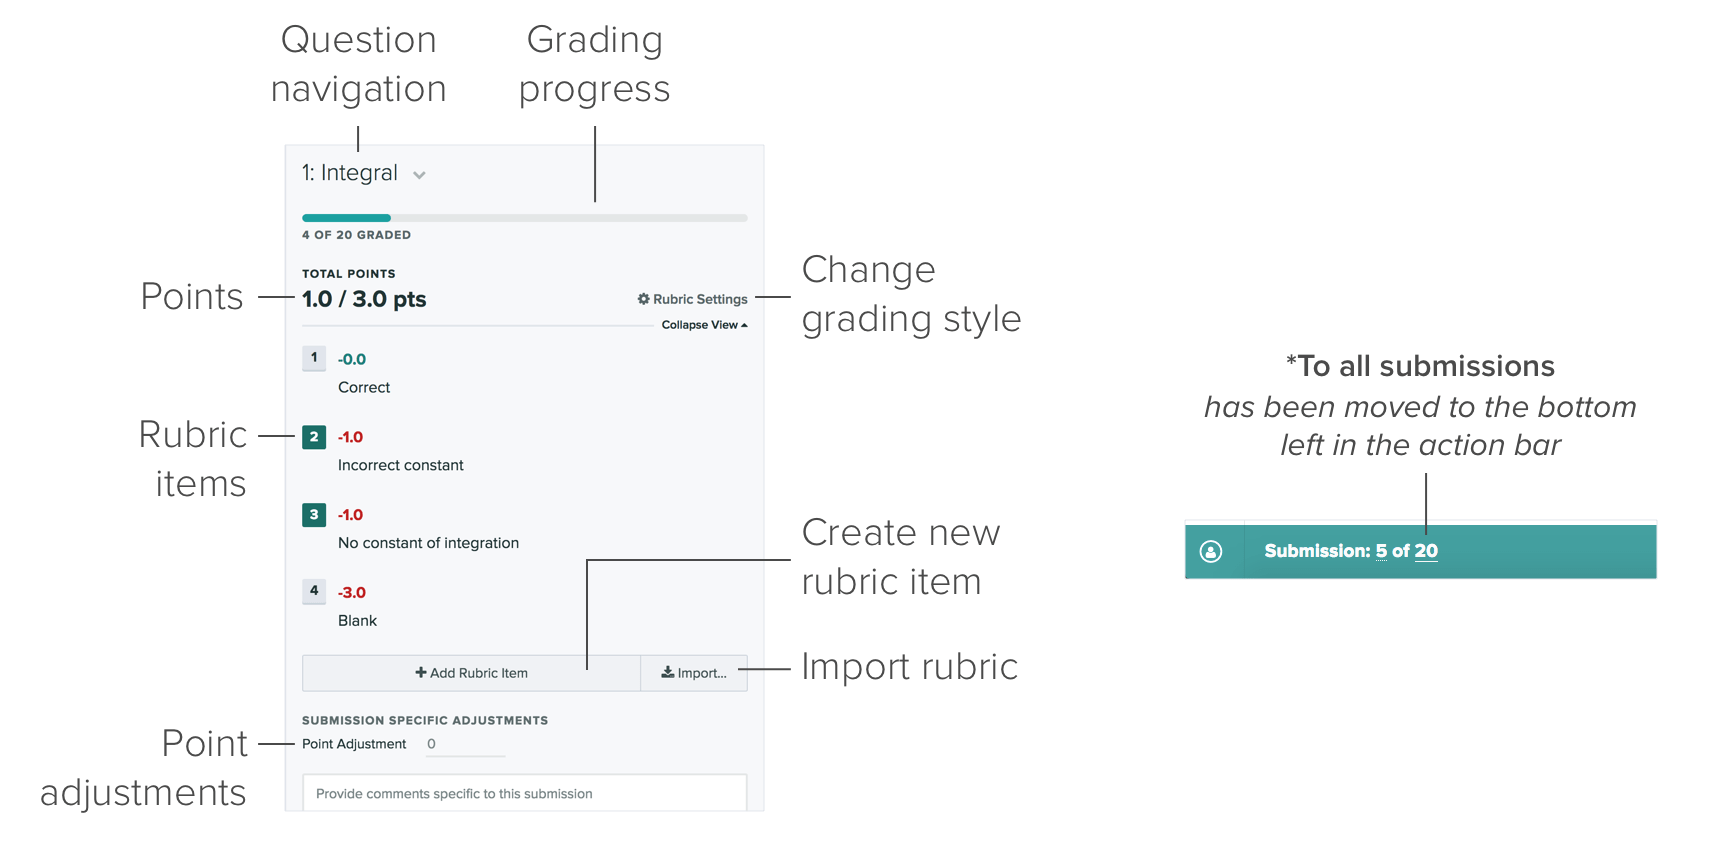
The rubric allows you to grade quickly and consistently, applying the same set of feedback to every submission. When you grade with Gradescope, you can change the rubric at any time. This means if you took off too many points or gave too many points for a particular rubric item, you can change it and Gradescope will automatically apply those changes to the other students who received the same mark.
You can rearrange the order of your rubric items at any time by clicking and dragging them, and you can select as many rubric items as you’d like for each submission. Use Shift + Enter to start a new line in your rubric item description. You can also collapse the rubric view to see more rubric items on the screen by clicking Collapse View.
Review and Publish Grades
Review Grades
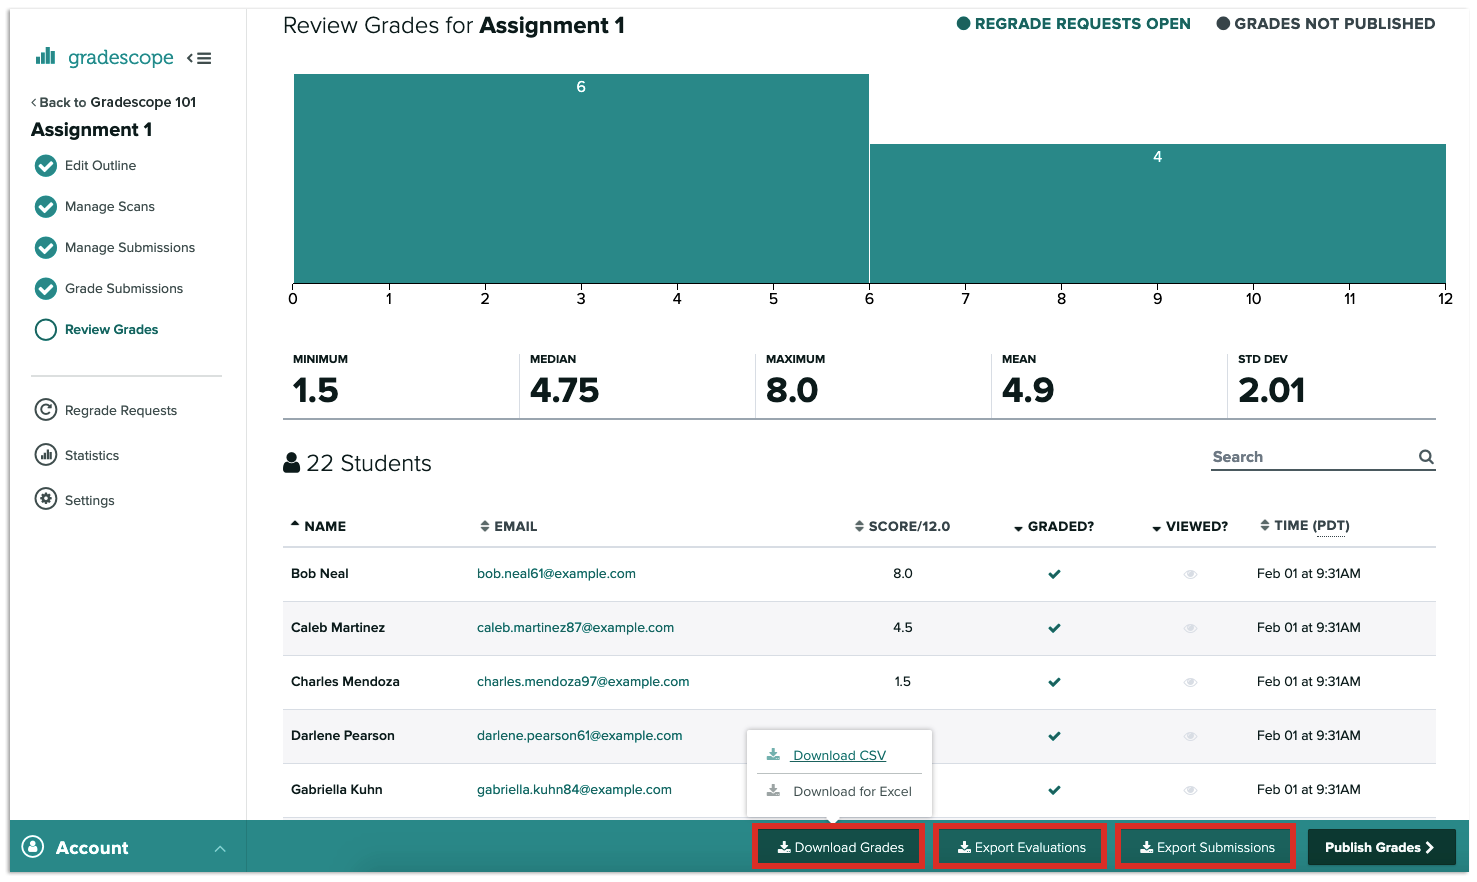
Once you are finished grading submissions, the Review Grades page gives you an overview of what was graded and allows you to publish grades, email students, and export evaluations & grades.
At the top of the page, you can see a histogram and some basic statistics that give you an overview of how your students did on the assignment. The “Time” column in the table below shows you the time when the student submitted to the assignment (for student-uploaded assignments) or when the instructor uploaded the student’s submission (for instructor-uploaded assignments). If your uploaded roster had separate columns for first and last names, you can alphabetize students by last name by using the Swap button at the top of the name column.
If you click on a student’s name, you can view that student’s graded exam. This is mostly the same view that the student will see once you publish grades, with the possible exception of hidden rubric items (see the section “Hide rubric items” below). To regrade a question, click on the question name and click Grade in the bottom action bar.
If you would like to download the student’s submissions, you can click on Download at the bottom of the page and select whether you would like to download the original or graded submission. If you download the graded submission, the rubric will appear on the first page of the downloaded PDF.
Publish and notify students
In order for students to be able to see their grades via Gradescope, grades must be “Published”. You can do so by clicking Publish Grades. You can check whether or not grades have been published by looking at the top right indicator. It will say “Grades Published” in blue if grades are published, or “Grades Not Published” in grey if they are not. You can also unpublish grades by clicking on Unpublish Grades.
Publishing grades does allow students to see their graded work, but simply publishing grades won’t notify students. If you wish to send an email to the students who submitted work, you can notify them by clicking Compose Email to Students and filling out the form. Every time you compose an email, a new email notification will be sent out to all students who have submissions for the assignment. Students with no submission or with partially graded submissions will not be able to view their scores. By default, the email notification contains some basic assignment statistics, but you may choose to remove these if you’d like.
Once your grades are published, you can see which students have viewed their grades by looking at the “Viewed?” column on the Review Grades page. If the eye icon is green, the student has viewed his or her exam. Note that students will never be able to see the name of the person who graded their submission.
Hide rubric items
By default, all rubric items are shown to students. We believe this helps students learn from their mistakes and assures them that grading was fair and accurate.
However, in some cases it may be preferable to hide all or part of the rubric from students. You can change this from the Assignment Settings page. There are three options for hiding rubric items:
- Show all rubric items
- Hide all rubric items
- Show only applied rubric items. In this mode, students will see only the rubric items which were applied to their submission for negative-scoring style questions. However, for positive-scoring questions, students will still see unapplied items, so that they can understand why they didn’t receive full credit.
Note that no matter which option is selected, students will always see submission-specific comments and point adjustments. Also note that, as the instructor, you will always see all rubric items when you view a student’s submission, even if you’ve opted to show students only applied rubric items or to hide rubric items from students. You can see the students’ view of the rubric by exporting submissions (click Export Submissions in the bottom action bar).
Exporting Student Grades, Evaluations, and Submissions
On an assignment’s Review Grades page, you can download documents of data on the following: assignment grades, assignment evaluations, and assignment submissions. To view this data, click the corresponding “download” button in the footer of the Review Grades page (see image below). Check out the video above (if you haven’t already) or keeping reading for a more in-depth look at how to access the data documents and what you’ll find in them.
Downloading assignment grades
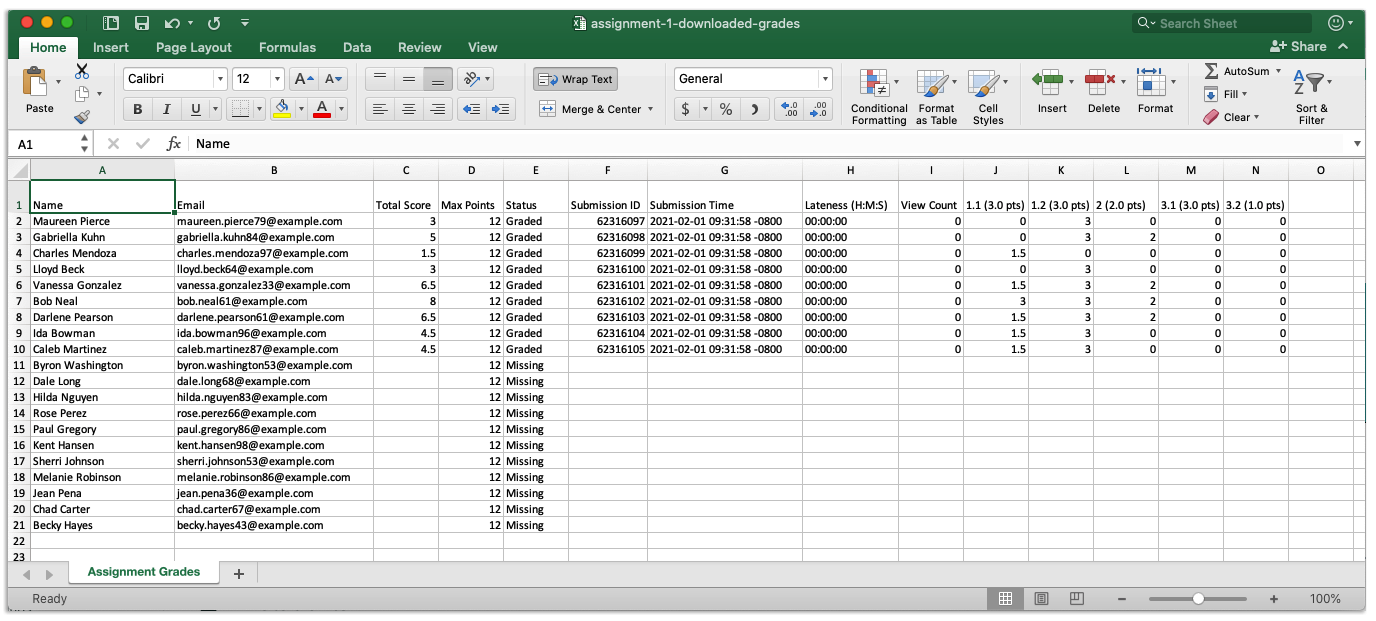
To export assignment grades, go to the Review Grades page, click the Download Grades button in the footer, and choose whether to download the information in a CSV or Excel spreadsheet. When you first open the spreadsheet, you may want to resize your columns or rows or use the Wrap Text feature in the spreadsheet toolbar to be able to view the content more easily on your screen.
In this file, you’ll find the following for each student in your course: their first and last name; their student ID (if IDs were added to the course roster); their email; any extra columns of info that were added to the course roster (e.g., section numbers); their total score and the max possible points on this assignment; their assignment status (i.e., Graded, Ungraded, or Missing); their submission ID generated by Gradescope; the date and time their work was submitted; their view count (how many times they viewed their graded, published submission); and the number of points they received on each question. For student-uploaded assignments, you’ll also see a Lateness column in H:M:S format. For students who submit before the due date, lateness will be recorded as 00:00:00 in the spreadsheet.
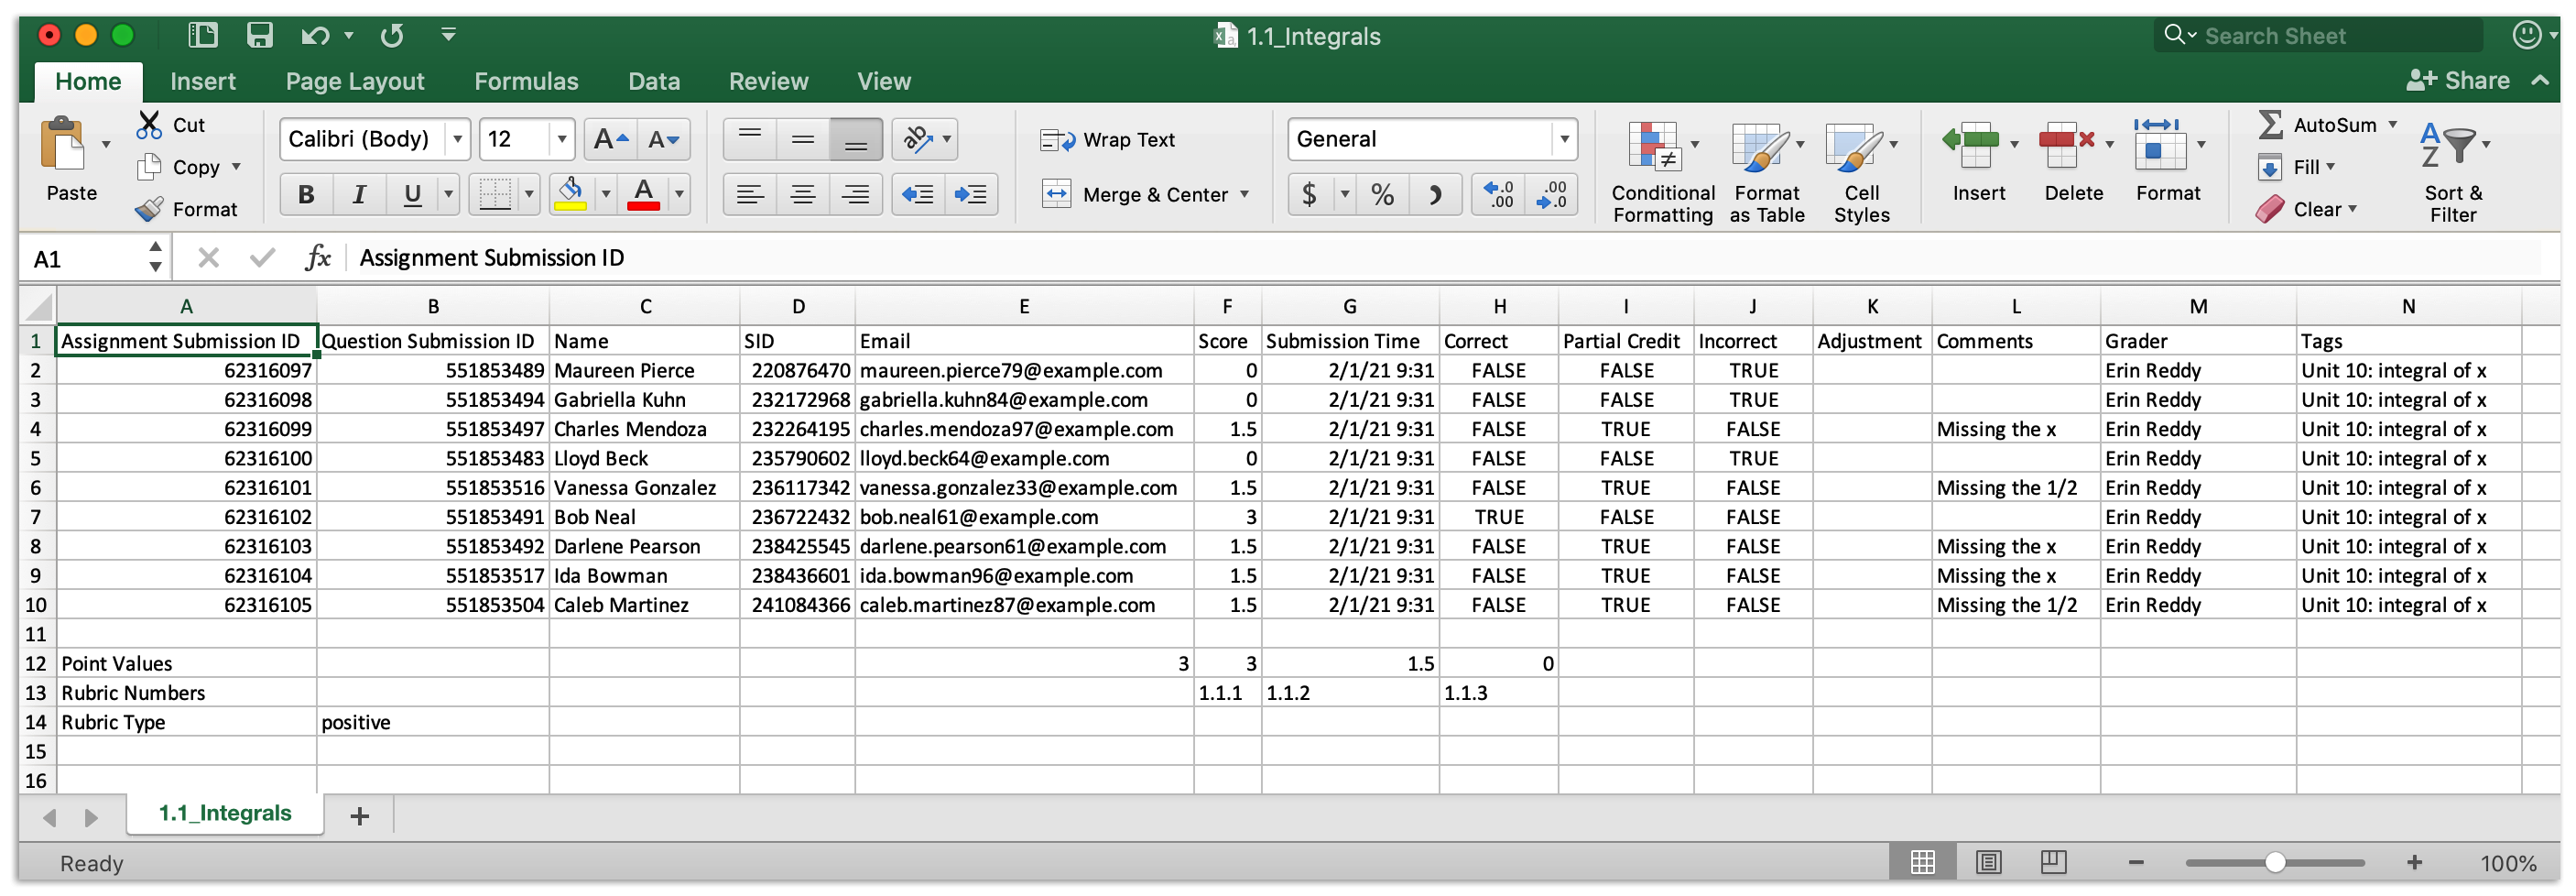
Exporting assignment evaluations
When you click the Export Evaluations button on the Review Grades page, a zipped folder of spreadsheets, one for each question and subquestion in the assignment, will automatically download to your computer.
在
Assignment and Question Statistics
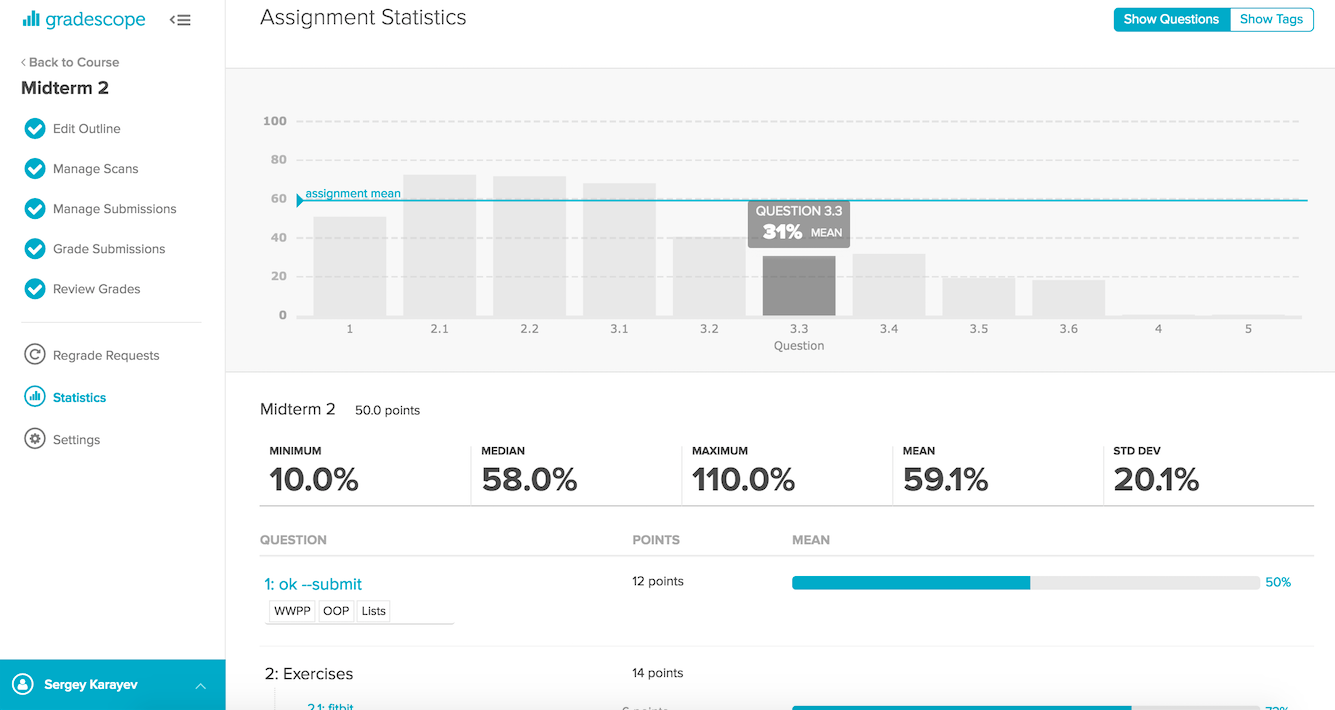
The Statistics page allows instructors to gain further insights into what their students have learned. Only students with uploaded submissions will be counted towards the assignment statistics.
The default view showcases the averages from each question. Clicking a question’s bar within the chart will focus on it, updating the stats under the chart.
You can also tag each question with concepts. By clicking “Show Tags”, you can then switch into Tag View to see the breakdown of points by tag. Delete any tag by clicking on the line next to the tag and clicking backspace/delete on your keyboard.

Question Statistics
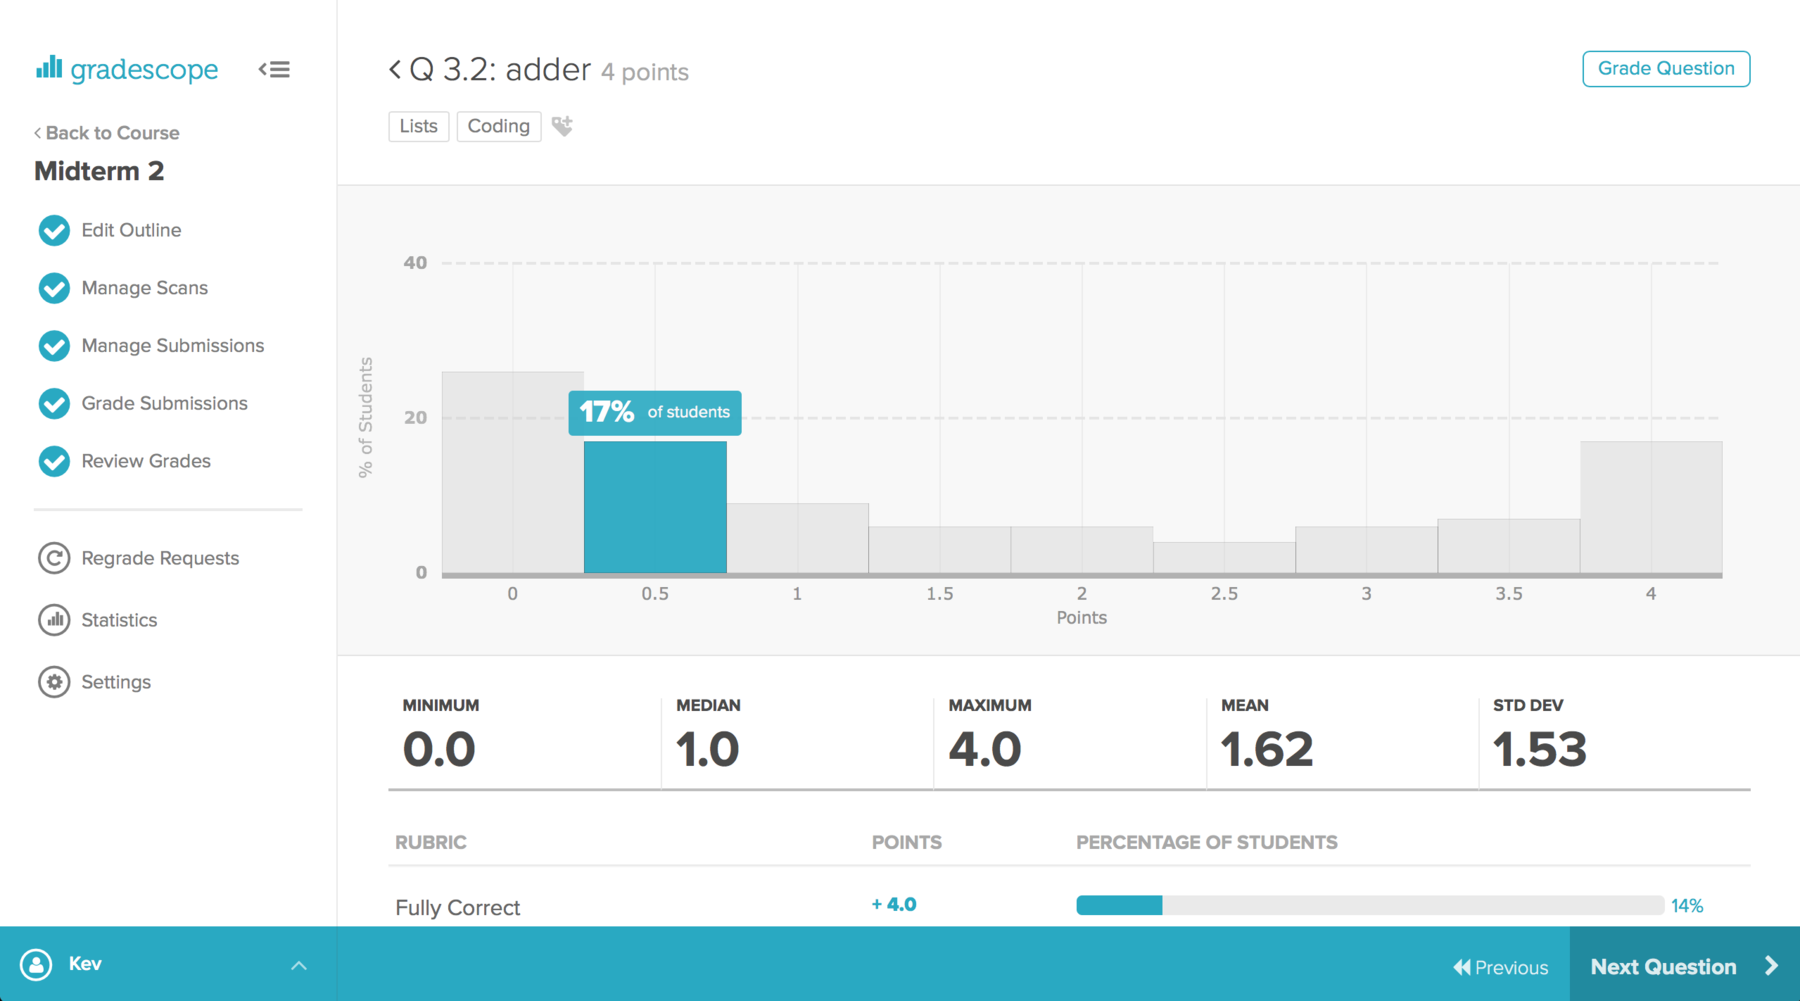
If you click a question in the table below the chart, you can see that question’s statistics, showing you how often each rubric item was applied. This allows you to pinpoint particular difficulties or concepts that students struggled with.
Regrade Requests
Regrade requests allow students to submit short statements about why they think their work should be given another look.
Regrade requests are enabled by default for all published assignments. To disable regrade requests, go to the Regrade Requests page in the left sidebar, click Regrade Request Settings, and uncheck the “Regrade requests enabled” box. You can also set the start and end date for when regrade requests will be accepted. If you don’t set start and end dates, regrade requests will be accepted for the assignment until you manually disable them.
By default, when students submit a regrade request, the grader who last graded the submission will receive an email detailing the request and how to view it. You can change your regrade request email notification preferences from your account settings or from the assignment’s Regrade Requests page. Note that these settings will apply to all courses and assignments on your account.
All instructors, TAs, and readers can view all regrade requests under the Regrade Requests page.
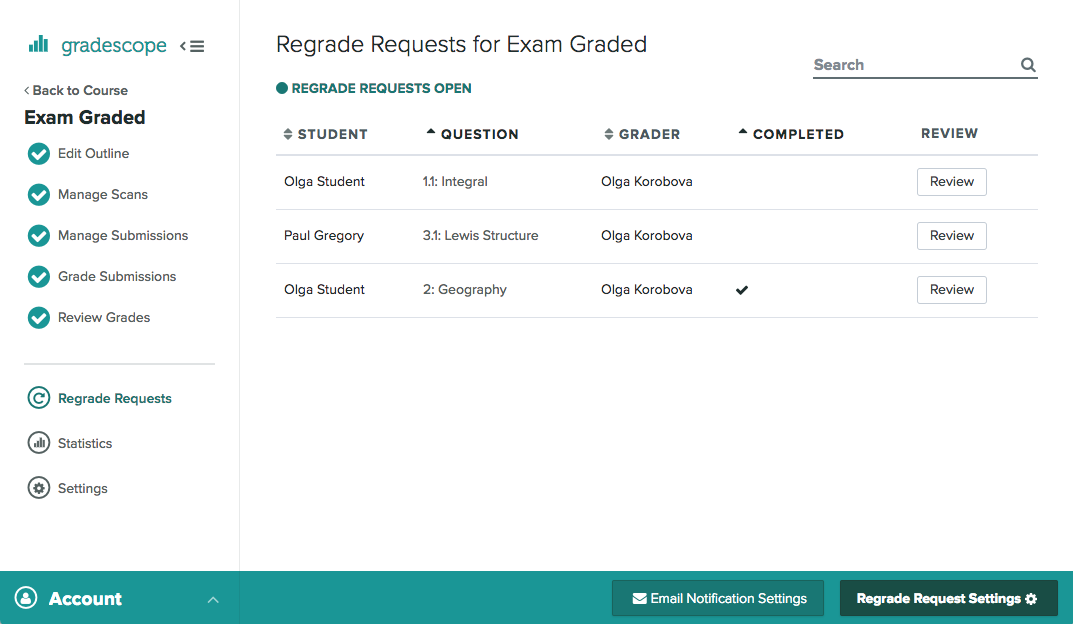
Clicking Review will take you to the student’s submission, where you can read the student’s request.

You can make changes to the grading by clicking other rubric items or by applying point adjustments. You can also modify rubric items which will change how all other students are graded, as it would during the grading process. If you just want to give a specific change to the student, use point adjustments.
To close the regrade request, type a reply to the student and click Close & Respond. The student will receive an email detailing your response and can view their adjusted grade on Gradescope. Students also have a page on their accounts where they can see the status of all the regrade requests they’ve submitted for your course. Note that students will never see the name of the instructor or TA who replies to their request. If a student has any further concerns, they can open a new regrade request.
Finally, you can view the complete conversation thread about a specific regrade request by viewing the student’s submission (accessible from either the Manage Submissions or Review Grades page) and selecting a question. The submission view will also show an “IR” badge next to any question that has a regrade request pending review and an “R” badge next to any question with a resolved regrade request.
Advanced Grading Options
Positive and negative scoring
By clicking on Rubric Settings, you will see that we support two different styles of grading. Positive Scoring means that rubric items default to adding points, starting from 0. On the other hand, with Negative Scoring (the default mode), rubric items default to subtracting points from the total points available for that question. If you want to have a rubric item that has the opposite effect of the default scoring style, you can change the sign before the point value from a minus (-) to a plus (+) or vice versa.
Point floors and ceilings
There are also options for a point ceiling to prevent scores greater than 100% and a point floor to prevent scores less than 0%. These are both enabled by default so that you don’t get scores out of the expected range, but you can disable them for extra credit questions, late penalties, or other situations where you don’t want the default behavior. You can set assignment-wide defaults for the scoring scheme and score bounds from the Settings page in the left sidebar.
Importing rubrics
If you’d like to, you can copy a question’s rubric items and rubric settings and reuse them in a different assignment or in a different question in the same assignment. On Gradescope Basic courses, importing rubrics is restricted to courses within the same term. With an institutional site license or on a Gradescope Complete course, you can import rubrics from any course in any term. Here’s how to reuse and import a rubric.
- With the rubric up on your screen for a particular question, click Import… This will bring up a dialog box containing your courses, assignments in each course, and all question rubrics for each assignment.
- Select the course, then the assignment, and finally the question rubric you’d like to import.
- Then, click the Import Rubric button to copy it into your assignment.
Formatting rubric items
If you’d like, you can use Markdown in rubric items to insert images, clickable links, code blocks, tables, bulleted and numbered lists, YouTube videos, bold/italicize text, and more. Simply click on the rubric item description box and either select one of the provided options or insert your custom Markdown command (see the gif below).
Additionally, you can use LaTeX to add math symbols in rubric items, comments, text annotations, answer group names, and regrade requests and responses.
Speeding up grading
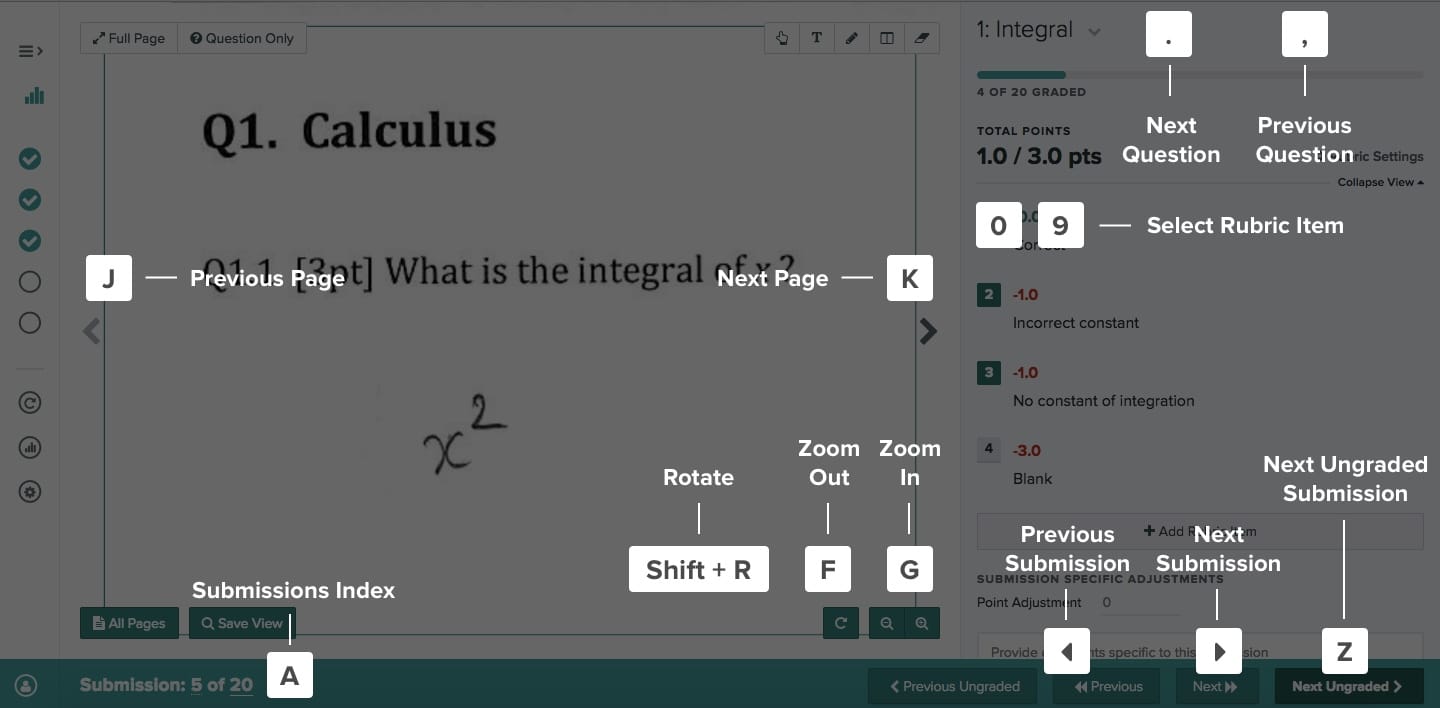
Once you understand the basics of interacting with Gradescope, you can speed up your workflow by using keyboard shortcuts.
- The numbers ‘1’-‘0’ map to the rubric items that you create for each question
- ‘z’ goes to Next Ungraded (the same question or subquestion on the next student’s submission that hasn’t been graded or isn’t currently being graded by anyone on the staff)
- Right arrow goes to Next (the same question or subquestion on the next student’s submission), and left arrow goes to Previous
- ‘g’ and ‘f’ zoom in and out of the student’s submission
- ‘shift+r’ rotates the student’s submission
- ‘,’ and ‘.’ go up and down the question outline for an individual student’s submission
- ‘j’ and ‘k’ go to the previous and next page of an individual student’s submission
- ‘a’ displays the list of all student submissions for a given question
To go to your last-viewed submission, you can use the back button in your browser. You may also open multiple tabs at once to grade multiple students’ submissions at the same time.
You can visit the Question Submissions Index by clicking on the total submission count, located in the lower-left corner. You can also access this page using the “a” keyboard shortcut. This page lists all the submissions for the question that you are on. It displays information such as the grader, the score that was given, and whether a submission was graded. If you are looking for a particular student’s submission to a question, this is an easy way to find it.
Annotating homework and exam submissions
When you grade Homework/Problem Set or Exam/Quiz assignments, you will have access to various annotation tools to allow graders to mark on a student’s submission. Students can see these marks, which can help them identify what part of the submission you want them to focus on. If you’d like to, you can also use LaTeX to add math symbols in comments, text annotations, answer group names, and regrade requests and responses.
- The navigation tool will help you place your annotations in the right spot by allowing you to click and drag to move around the submission.
- The text tool T (shown in gif below) allows you to type comments directly on the submission. After selecting it, click anywhere on the page to add text anchored to that spot. Or, to quickly add text from the navigation tool, just double-click on the page. Text annotations will be autosaved and can be reused.
- The pencil tool allows you to mark freeform on the submission.
- The box tool allows you to draw boxes by clicking and dragging to create rectangles on top of the submission.
- The eraser tool allows you to click on any annotation to remove it.
There are also few ways to zoom:
- If you scroll over the submission you can zoom in/out
- You can click the plus (+) and minus (-) button in the bottom right while hovering over the submission.
- You can use the keyboard shortcuts f and g to zoom in/out
If you move the submission around or zoom in/out and want to save this view to be the default view for that question, you can click Save View.
- Saving the submission view only affects your default view of that question and will not affect other graders’ default view.
- If you wish to change the default view for all graders, edit the question’s region on the Edit Outline page.
AI-Assisted Grading and Answer Groups
For fixed-template assignments, there are two features you can use help grade multiple students’ work at once:
- Answer Groups (for all question types): the ability to form and grade answer groups, instead of individual student answers.
- AI Assistance (for some question types): Gradescope AI automatically forms suggested answer groups for your review.
Setting Question Type
To get started, go to the Grade Submissions tab and click on a question. If you’d like to form answer groups for the question, click Form Answer Groups First. If you’d like to grade each submission individually (skip answer grouping), click Grade Individually. You can also save this setting for all other questions on the assignment by checking the “apply grading method to all other questions” box.
The first step in the Answer Groups workflow is selecting the type of question. Four question types are currently supported: Manually Grouped, Multiple Choice, Math Fill-in-the-blank, and Text Fill-in-the-blank.
Manually Grouped
This is suitable for all questions. Gradescope will simply find and group blank submissions for you. You can then manually form your own groups of answers.
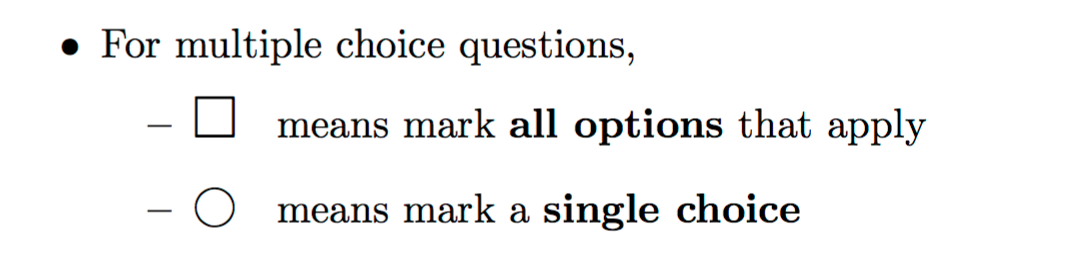
Multiple Choice
Questions where students fill in bubbles or check squares. Gradescope does not currently support questions of circle-the-right-choice variety. There must be clear mark areas, and they must be clearly selected by the student (no half-filled bubbles). Students should use an ink pen to select the mark areas for maximum clarity.
Your uploaded assignment template must be completely blank; do not upload an answer key as your template. When drawing question region boxes on the assignment outline, make sure that each box only covers one question’s mark areas. The size of the question region boxes will not affect the AI’s accuracy.
Gradescope will show you the detected mark areas in blue. If the squares are not properly over the answer areas, you can click Edit Mark Regions to adjust them.
We recommend that the following types of marks are used:
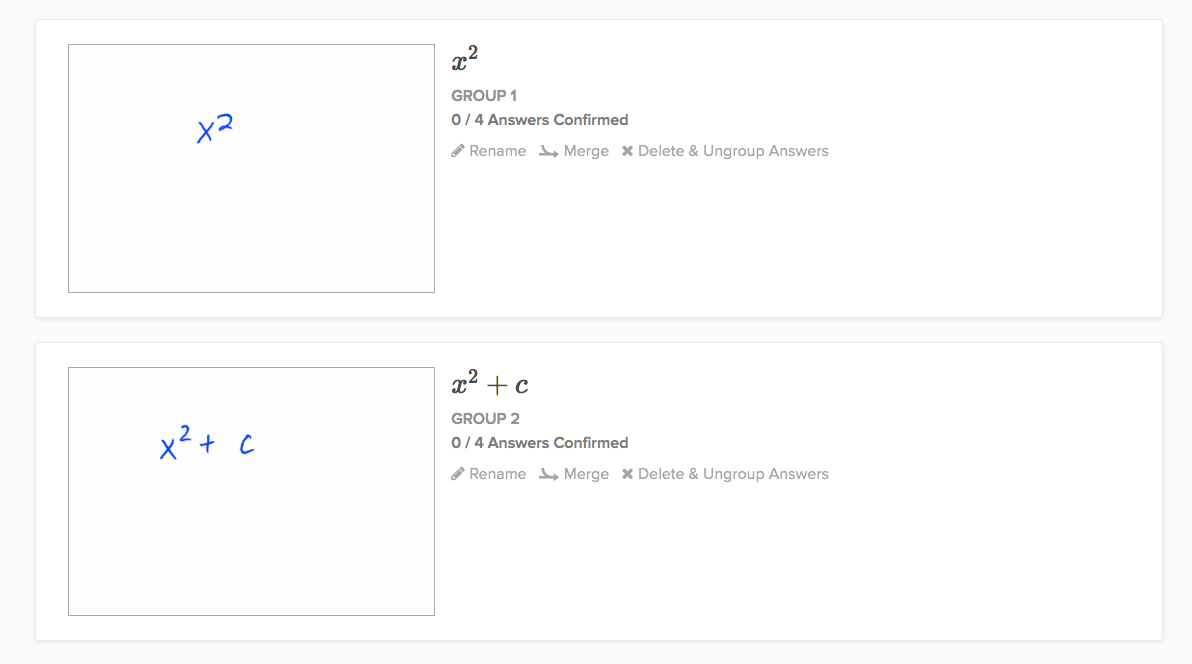
Math Fill-in-the-blank and Text Fill-in-the-blank
Gradescope AI is able to read student handwriting of English-language text and of math notation (including fractions, integral signs, etc.). The main constraint is for the student answer to be on just one line, which is most easily enforced by providing a clear box or underscored area in the assignment template, as in the two examples below. You can adjust the final answer area by clicking Final Answer Area from the question type selection page.

Once you select a question type, click on “Set Question Type”.
Reviewing Suggested Groups
If you selected Multiple Choice, Math Fill-in-the-blank, or Text Fill-in-the-blank as your question type, Gradescope AI will search through your students’ submissions and group them by content. Each group will contain a minimum of two answers. The next step in the Answer Groups workflow is reviewing the suggested groups. Note that, if you edit the question region in the assignment outline, unconfirmed groups will be deleted for that question in the course of re-processing. Confirmed groups will remain.
On the Review Groups page, you will see an image of one of the responses within the group, the group name, and how many student submissions are in that group. You can edit the group name or delete the group by hovering over the group with your mouse and clicking the Rename or Delete (and Ungroup Answers) buttons.
If there is a specific part of the question region that you would like to group the answers by, you can indicate the answer region by clicking Final Answer Area at the top of the page. Changing the final answer area will reprocess the submissions and update the groups.
Click on the image for your first group to review the answers in that group. If all of the answers within the group look the same, click Confirm & Review Next Group in the bottom action bar. If some answer does not belong in the group, click on it, or press the space bar while hovering over it. You can quickly navigate between answers by using the arrow keys on your keyboard.
If you find that two or more proposed groups have the same answer, you can click Merge to merge the groups. Select the groups you want to merge and then click Merge Selected in the bottom action bar.
Repeat this process until all groups have been reviewed. If you realize you made a mistake, you can go back and re-review a group by clicking View Groups in the bottom action bar, or by using the back button in your browser.
If you upload more submissions to the assignment at a later time, Gradescope AI will attempt to sort them into your existing answer groups, and you’ll need to re-confirm the groups.
Manually Grouping Ungrouped Answers
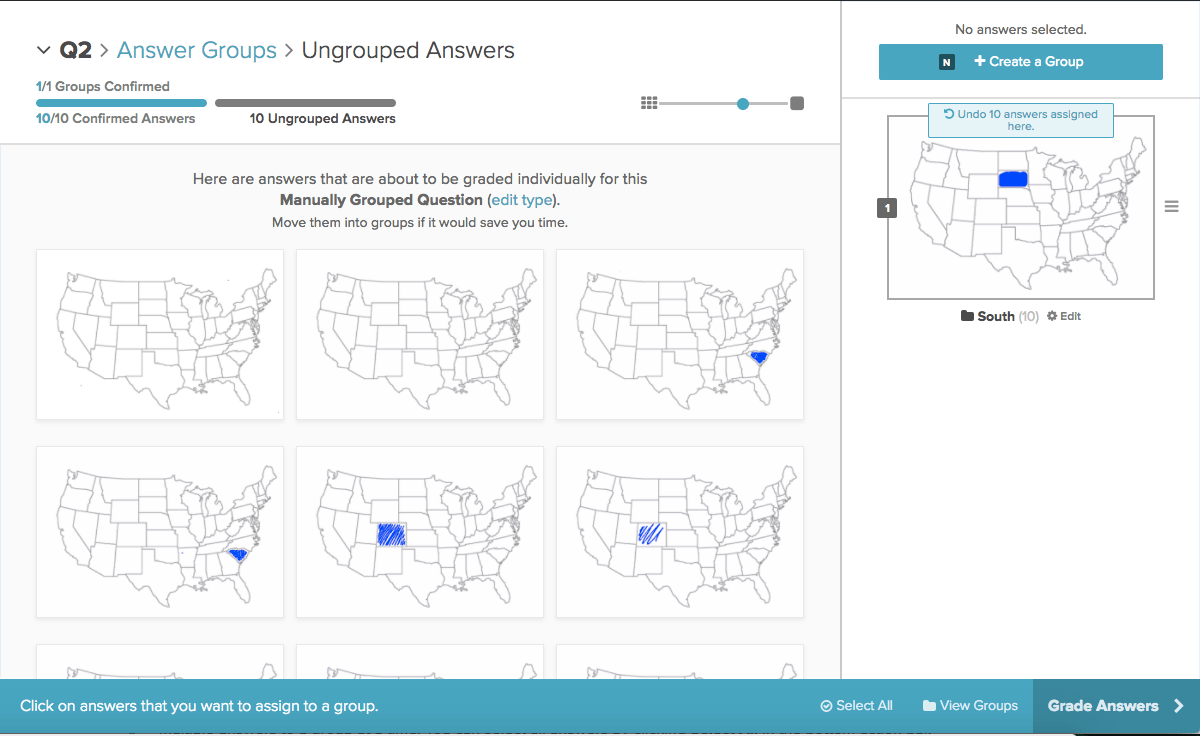
Once you’re done reviewing suggested groups, or if you selected “Manually Grouped” for your question type, you will be taken to the Ungrouped Answers page.
You will see the ungrouped answers on the left and a list of the groups (if any) on the right. You can create a new group at any time by clicking Create a Group in the upper right corner. Click on the Edit button below an existing group to delete the group, edit its title, or merge it with another group.
You can add ungrouped answers to a group by clicking and dragging, or by clicking on each answer and then clicking on the group. Note that you may add multiple answers to a group at a time. You can select all answers by clicking Select All in the bottom action bar.
You can also use keyboard shortcuts to speed up the process of manually grouping answers. Use the N key to create a new group. Use the arrow keys to jump between ungrouped answers. Use the space bar to select or deselect an answer. Use the number key on your keyboard that corresponds to the group number to assign the answer(s) to an existing group.
When you’re done grouping, click Grade Answers in the bottom action bar. Feel free to leave some answers ungrouped: you will grade ungrouped answers individually after you have graded all of the groups.
Grading Groups
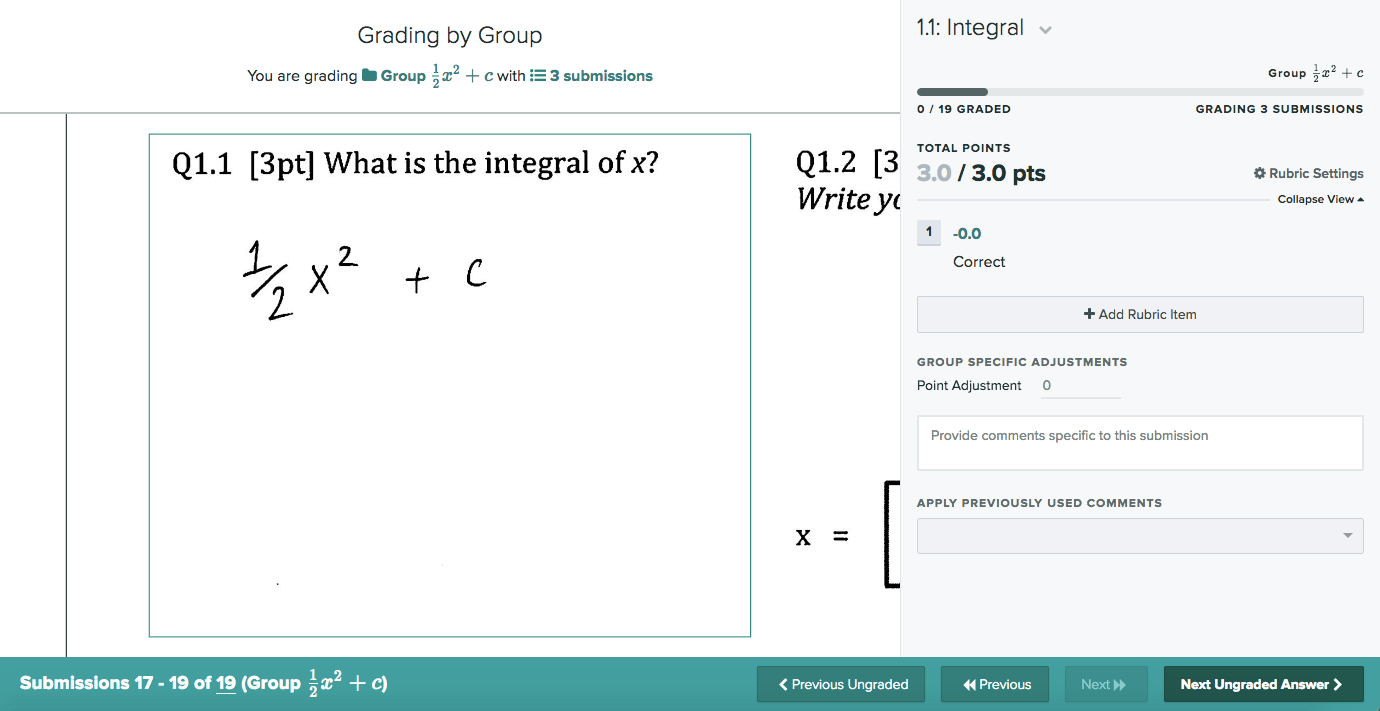
The grading interface for grading by group is very similar to the regular grading interface. In this section, we explain the differences that Group Grading introduces.
On the left side of the grading interface, you will see the name of your group, the number of submissions in that group, and one sample submission. On the right side of the grading interface, you’ll see the progress bar and your rubric.
If you would like to review all the answers in the group using the grouping interface, click on the group name underneath “Grading by Group” on the left.
To grade a group, simply select the appropriate rubric items and click “Next Ungraded” (or press ‘Z’ on your keyboard). You will be taken to your next group, or to the next ungrouped submission if all groups have been graded. Note that the progress bar will change to reflect the number of individual submissions that were just graded.
Note that any comments you make in the comment box below the rubric will automatically apply to all students in the group. However, the annotation tools should not be used when grading groups, since the annotation would only apply to the sample submission that appears for the group.
Grading Individual Submissions Within a Group
If you would like to find and grade a specific student’s submission in the group, click on the Submissions link next to the group name. Clicking on a submission from that table will take you to the regular grading page, where you can grade each submission individually, rather than as part of a group. If you want to jump back to grading by group, just click Grade the whole group instead in the upper left section of the page.
Note that if you formed groups, submissions are presented for grading in group order, largest group first, and sorted by time of submission within a group.
Applying Regrade Requests to a Group of Submissions
If your student submits a regrade request, you have the option of applying the regrade to just that individual student (the default), or to the entire group that the student’s submission was a part of.
If you would instead like to apply the regrade to the entire group of submissions, simply open the regrade request and then click Grade the whole group instead at the top of the page. Your changes apply to all submissions in that group, except for submissions that were graded individually.