Gradescope offers a variety of different types of gradable items/assessments to suit your needs for grading students’ work. The following is a list of tutorials on the main 6 types of assessments, as well as an instructional on creating a general grading outline.
Create a Grading Outline
Creating the Assignment Outline is the first step in the assignment creation workflow for Exam / Quiz and Homework / Problem Set assignments. To get started:
- Upload a blank version of your assignment to Gradescope when you’re creating your assignment.
- Note that students will be able to view and download this blank template from Gradescope if you’ve allowed students to upload their own work and enabled Template Visibility via your Assignment Settings.
- For instructor-uploaded assignments, students will never see the template file or any other part of the assignment until grading is complete and you click Publish Grades.
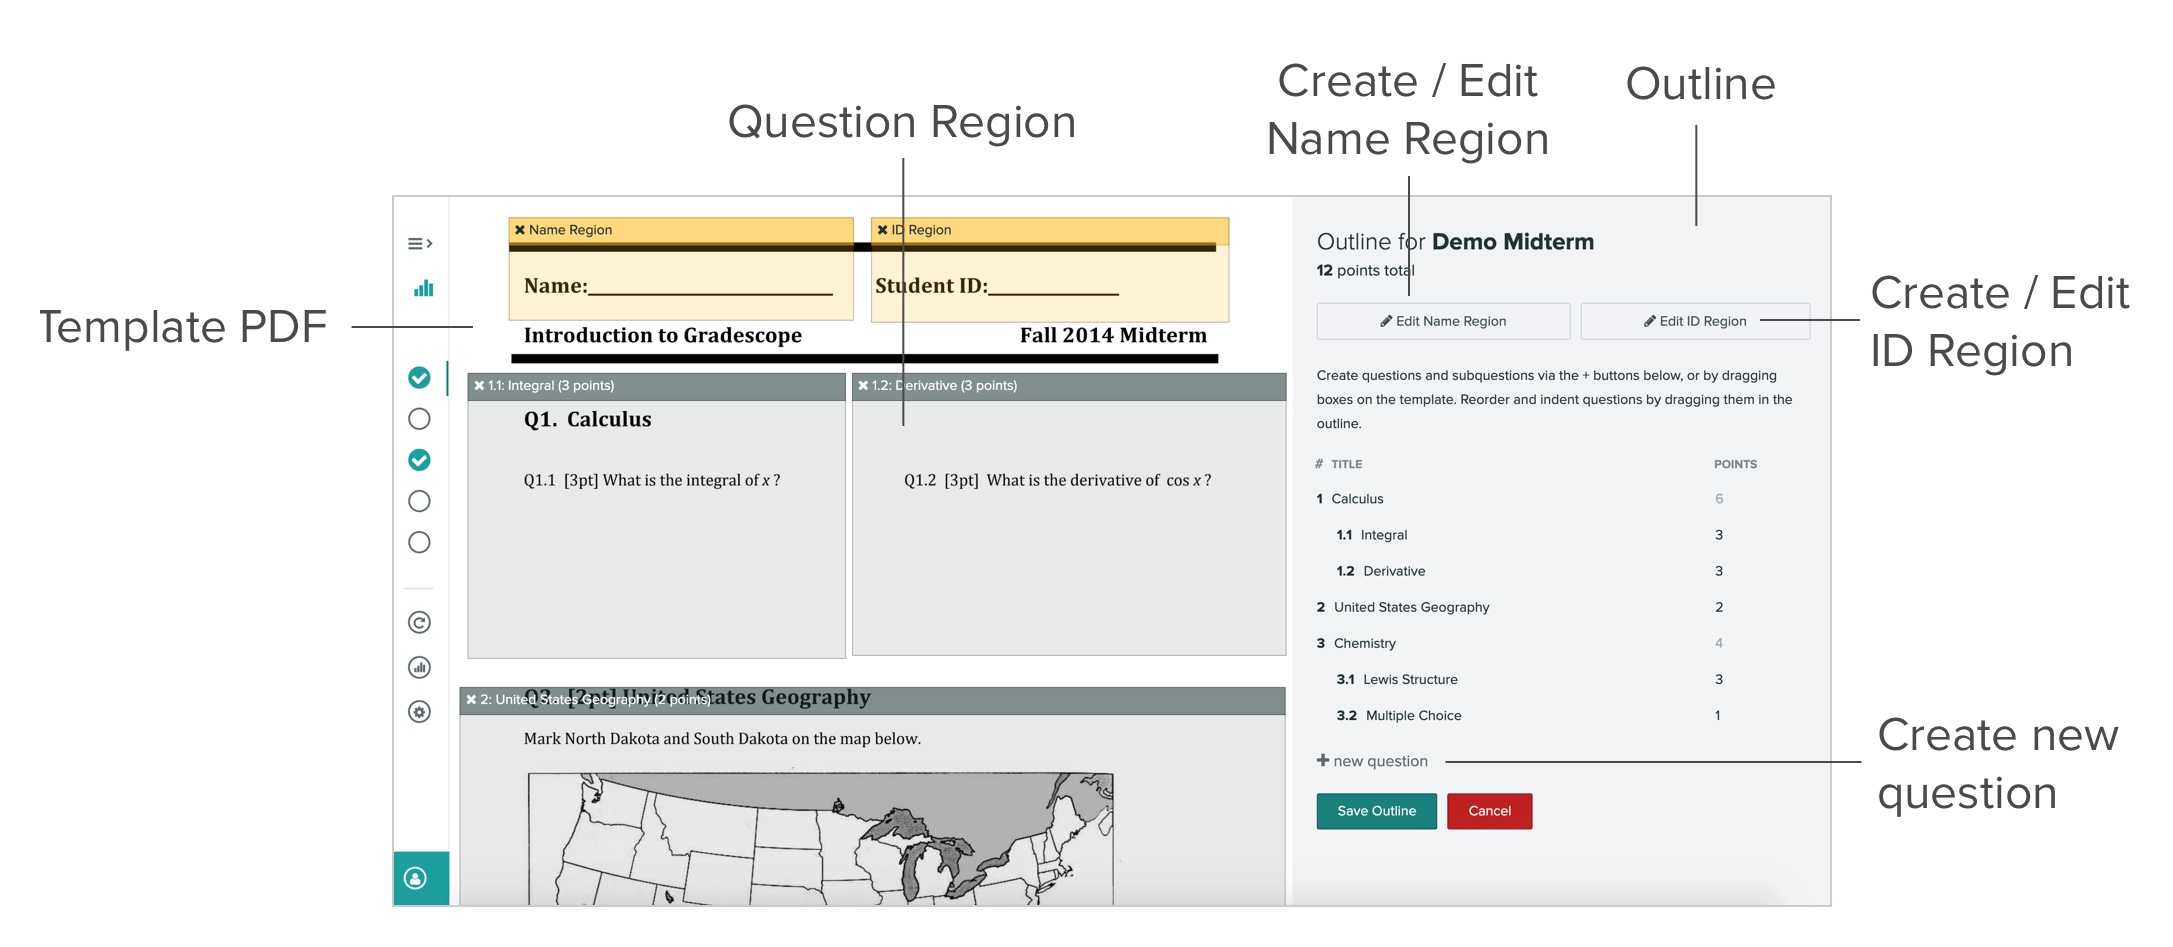
- You will see the Template PDF on the left and an empty outline on the right.
- To start creating an outline click + new question to begin adding questions. You can title your questions and add point values. As you build the outline, a total point tally for the assignment will appear at the top of the page.

- You can also create subquestions by clicking the teal “add subquestion” icon (to the right of the red “x” delete icon), or by dragging a question into another one. You can also drag a subquestion outward to turn it into a question.
- You can always remove a question, a subquestion, or a group of subquestions by clicking the red “x” delete icon next to each of these items. You may also replace the template PDF at any time by going to Settings in the left sidebar. Replacing the template will preserve the outline, any region boxes, and any grading you’ve already done for that assignment.
- If you’d like to create extra credit questions, simply set the point value for these questions to be 0 on this page. You’ll then be able to disable the score ceiling during grading and award students points above 0 during grading.
- If your outline is for a student-submitted, variable-length assignment, then you are done once you list all of your questions/subquestions and assign point values. When your students upload an assignment, they will mark the location of each question on their submissions.
- If your outline is for a fixed-length assignment, you will need to set name and question regions on your template.
- For fixed-length assignments, you will need to specify the areas where students will write their answers. You can do this by resizing and dragging question boxes on your Template PDF. You can also create new questions and subquestions by clicking and dragging on the PDF.
- Note that if you ever replace the template PDF (from the assignment’s Settings page), all of your question regions will be preserved.
- When grading an assignment, the viewer will automatically zoom to the region you designated. It’s generally helpful to create regions that are slightly larger than the actual area you expect students to use.
Create an Exam or Quiz
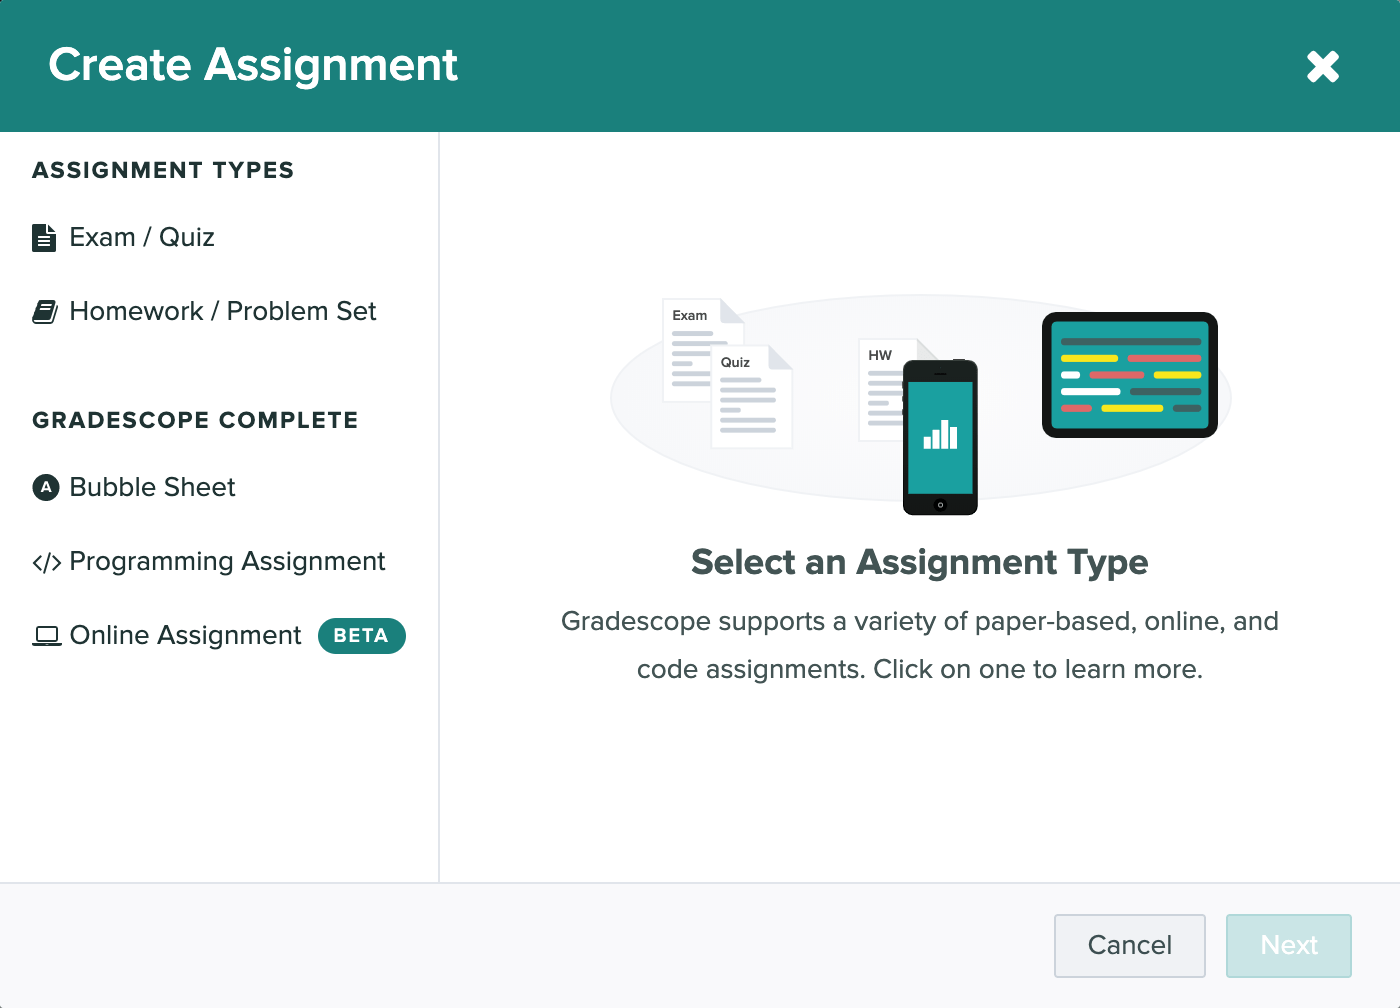
- From the assignments page, click on the Create Assignment button in the bottom right. This will bring up a dialog box with various assignment type options.
- Select the Exam / Quiz option to see a brief overview of the assignment type. Click Next to choose the settings for the assignment.
- You will need to give the assignment a title and upload a blank copy of the exam to help you create the assignment outline you’ll use for grading. By default, the Exam / Quiz assignment type is set up so that instructors can scan and submit their students’ work. If you’d rather have students scan and submit their own work, change the Who will upload submissions? setting to “Students” and follow the instructions in the “Homework and Problem Sets” section below.
- Once the assignment is created, you’ll:
- Mark the question regions on a template PDF (as shown in the Create a Grading Outline tutorial above)
- Upload and process scans*
- Match student names to submissions*
- Grade student work with flexible, dynamic rubrics
- When grading is finished you can:
- Publish grades and email students
- Export grades
- Manage regrade requests
- See question and rubric-level statistics to better understand what your students have learned
*Not applicable if students are uploading their own work.
Create a Homework Assignment or Problem Set
- To create a homework assignment, click the Create Assignment button on the bottom right of the Assignments page. This will bring up a dialog box with various assignment type options.
- Select the Homework / Problem Set option and click Next to pick the settings for the assignment.
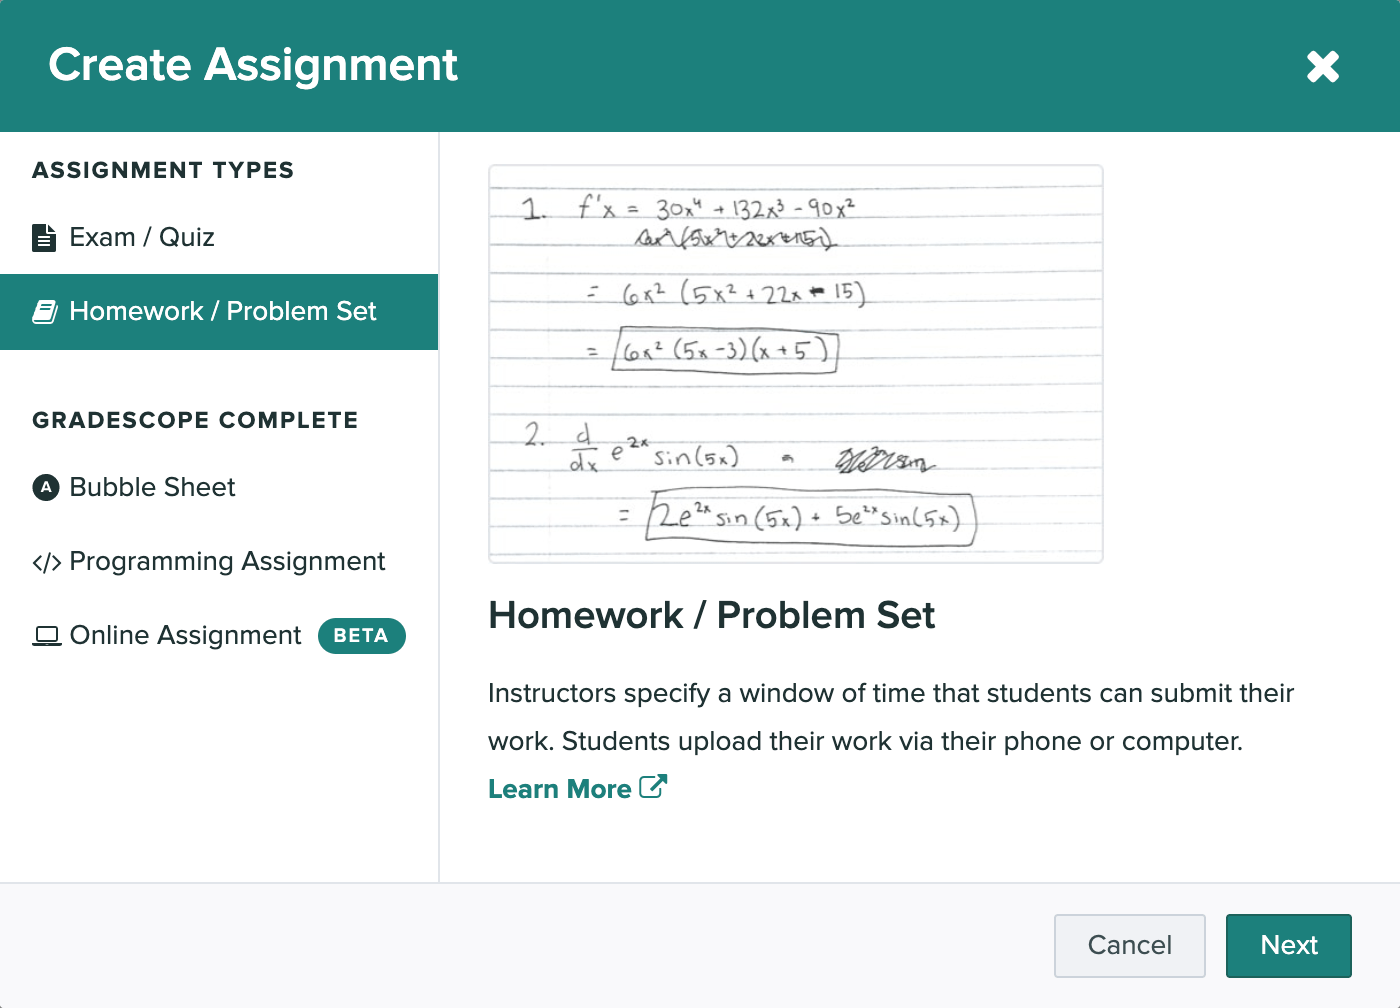
- Give the assignment a title and upload a blank copy of the homework to create the assignment outline you’ll use for grading. By default, the Homework / Problem Set assignment type is set up for students to submit work.
- In a typical homework assignment, students will upload their work and be directed to mark where their answers are on their submissions, making them even easier for you to grade. If you want to scan and submit work for your students, you can change the Who will upload submissions? setting to “Instructors” and follow the steps above in the “Exam and Quizzes” section. If needed, you can also submit on behalf of your students, even if you’ve originally set the assignment to be student-uploaded.
- Gradescope will prompt you to set the assignment release date and due date, choose your submission type and set your group submission policy.
- Next, you can select “Enforce time limit” and use the Maximum Time Permitted feature to give students a set number of minutes to complete the assignment from the moment they confirm that they’re ready to begin.
- Under Template Visibility, you can select “Allow students to view and download the template” to let students view and download a blank copy of the homework after the assignment release date.
- You will then create the assignment outline and wait for students to submit their work. You can begin grading and building rubrics as soon as a single submission is uploaded (although we recommend waiting until the due date passes, since students can resubmit), and you can view all student-uploaded submissions from the Manage Submissions tab.
- The rest of the workflow is the same as exams and quizzes: you can publish grades, email students, export grades, and manage regrade requests.
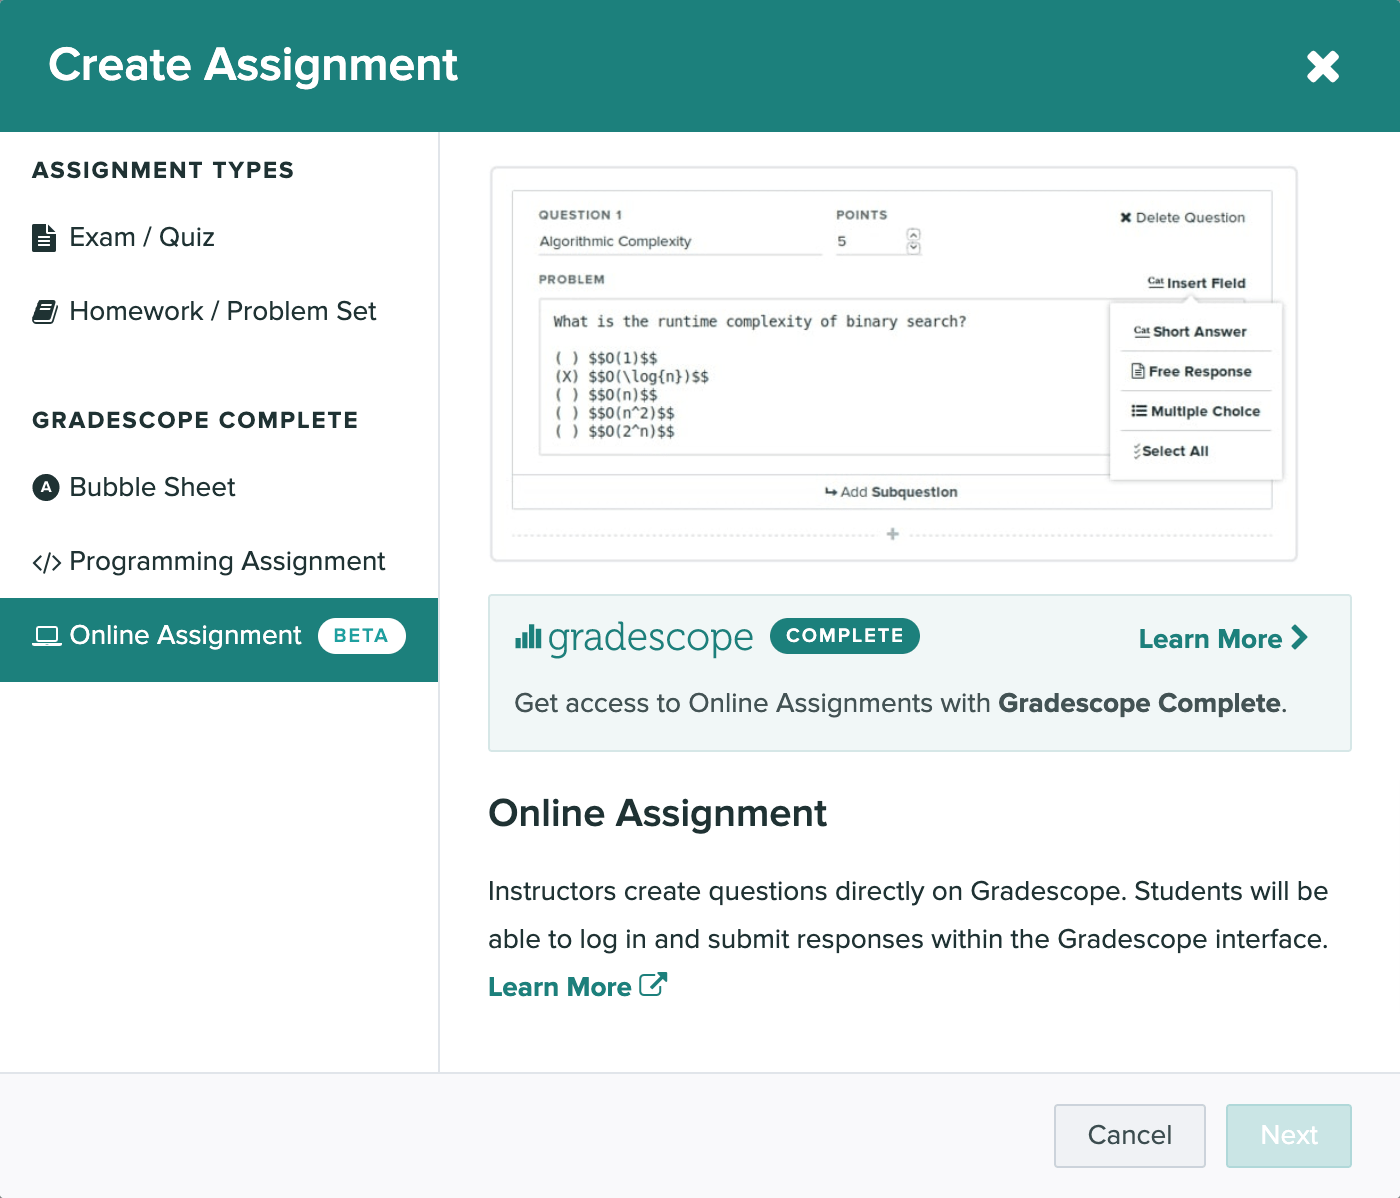
Create an Online Assignment
Currently in beta, Online Assignments let you create questions directly on Gradescope. Students will be able to log in and submit responses within the Gradescope interface. If you’d like, you can also give students a set number of minutes to submit their work from the moment they open the assignment. Additionally, you can choose to hide questions and responses once the due date passes or the time limit runs out to help prevent students who have completed the assignment from sharing questions and answers with students who have not finished working. For some types of questions (multiple choice, select all, and short answer), you can indicate the correct answer ahead of time, and student submissions will be automatically graded. You can also add a File Upload field to a question that will allow students to complete their work on that question outside of Gradescope and then upload files(s) (e.g., a photo or PDF of handwritten work) containing their answer.
- On your course’s homepage, click Assignments (left sidebar) and then Create Assignment (bottom right). Select “Online Assignment” from the list of assignment types when it appears.
- Add an assignment title, set a release date, due date, and (Optional) late due date. If you’re making a test assignment that students should not see, make sure to set the Release Date far in the future, or use a demo course that has no real students in it.
- (Optional) To give students a set number of minutes to submit work, select Enforce Time Limit. Then, use the Maximum Time Permitted field to set your time limit. See more info on this feature below.
- (Optional) To allow groups of students to submit the assignment together, select the Enable Group Submission, and set your preferred group size.
- Click Create Assignment. This will take you to the Assignment Outline where you add your questions.
- On the left side of your Assignment Outline, enter your first question title (optional) and point value. You can preview your exam on the right side of your screen as you add questions.
- While you’re creating your outline, note that all instructors and TAs in your course will be able to edit it too.
- If multiple people are editing the outline at once, all the users will see a warning message at the top of your screen.
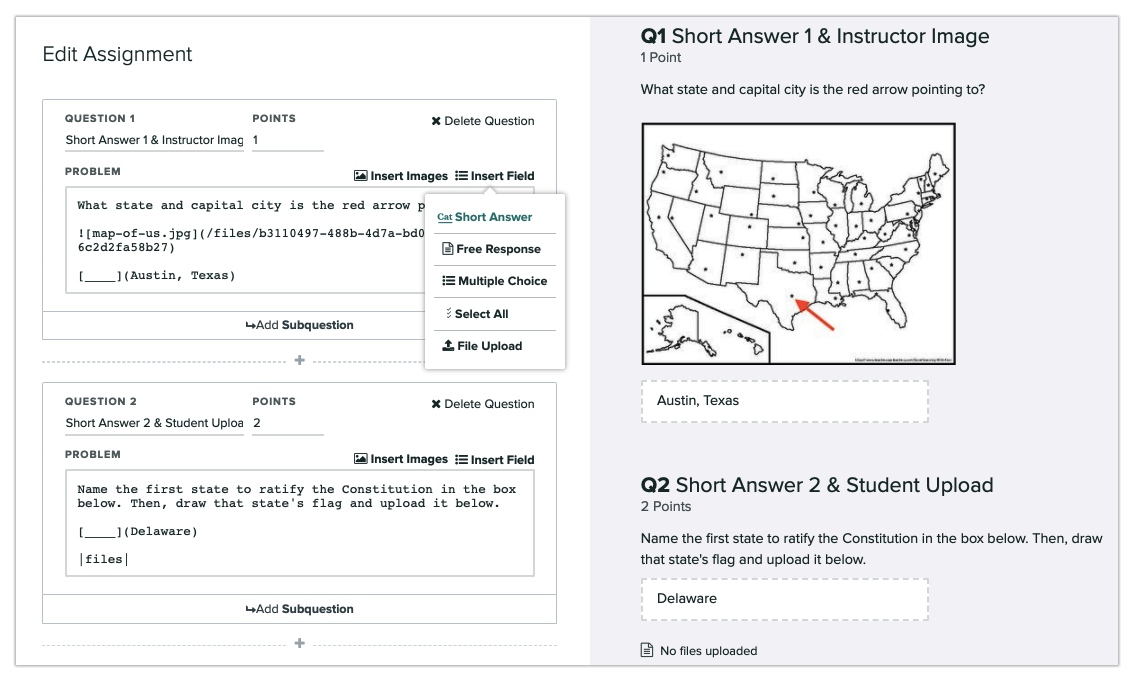
- When you’re ready, add your question text in the Problem Field. You can use LaTeX and Markdown if needed to format the question text. Then, put your cursor on the line below your question text. Click the Insert Field dropdown.
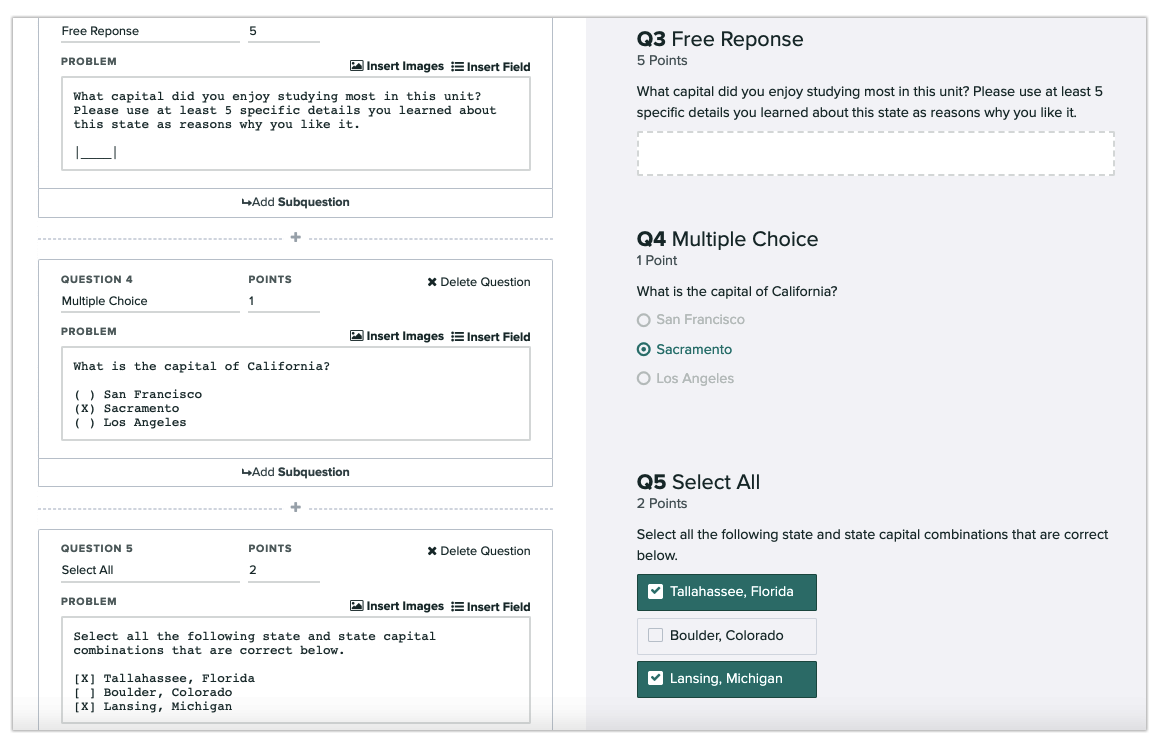
- From the dropdown, select the way you’d like students to answer this question: short answer, free response, multiple-choice, select all, or file upload. You can add multiple answer fields to a question if you’d like, but be sure each answer field is on a line by itself.
- Click the Add Question button after each question to insert the next problem or task in the assignment along with the point value and answer input fields, repeating the process explained in Steps 1-3. Click the Add Subquestion button after a question to add a child question beneath it and create a group.
- Note that when you make a group of questions, the top-level question can only be used for description text, and students cannot submit any input fields within that question. For instance, if you have Questions 1.1, 1.2, and 1.3, students can only submit answers to those, and not to Question 1, the parent of the group.
- When you’re finished, click Save. If you close your outline before saving it, the questions you added and changes you made will still be there when you return. However, even if the assignment release date has passed, your students and the other instructors in your course will not be able to see the latest questions or changes until you click Save Assignment either in the footer or after the last question in the outline. If you return to your outline and do not want to keep your unsaved changes, click the up arrow next to the Save Assignment button in the footer, and then click Discard Changes when the option appears.

- Once the assignment is created you’ll:
- Wait for submissions from students
- Optionally, manually grade student answers
- And when grading is completed you have access to the usual steps:
- Publish grades and email students
- Export grades
- Manage regrade requests
- See question and rubric-level statistics to better understand what your students have learned
For more information about Online Assignments, check out the specific Gradescope help center item about them.
Create a Programming Assignment
With Programming Assignments, students submit code projects and instructors can automatically grade student code with a custom written autograder and/or manually grade using the traditional Gradescope interface. Students can submit multiple files of any file type, including files of different types, to programming assignments on Gradescope. Students can also submit to Gradescope via GitHub and Bitbucket integration. You can then autograde the code, manually grade it with a rubric and in-line comments, or use a combination of autograding and manual grading.
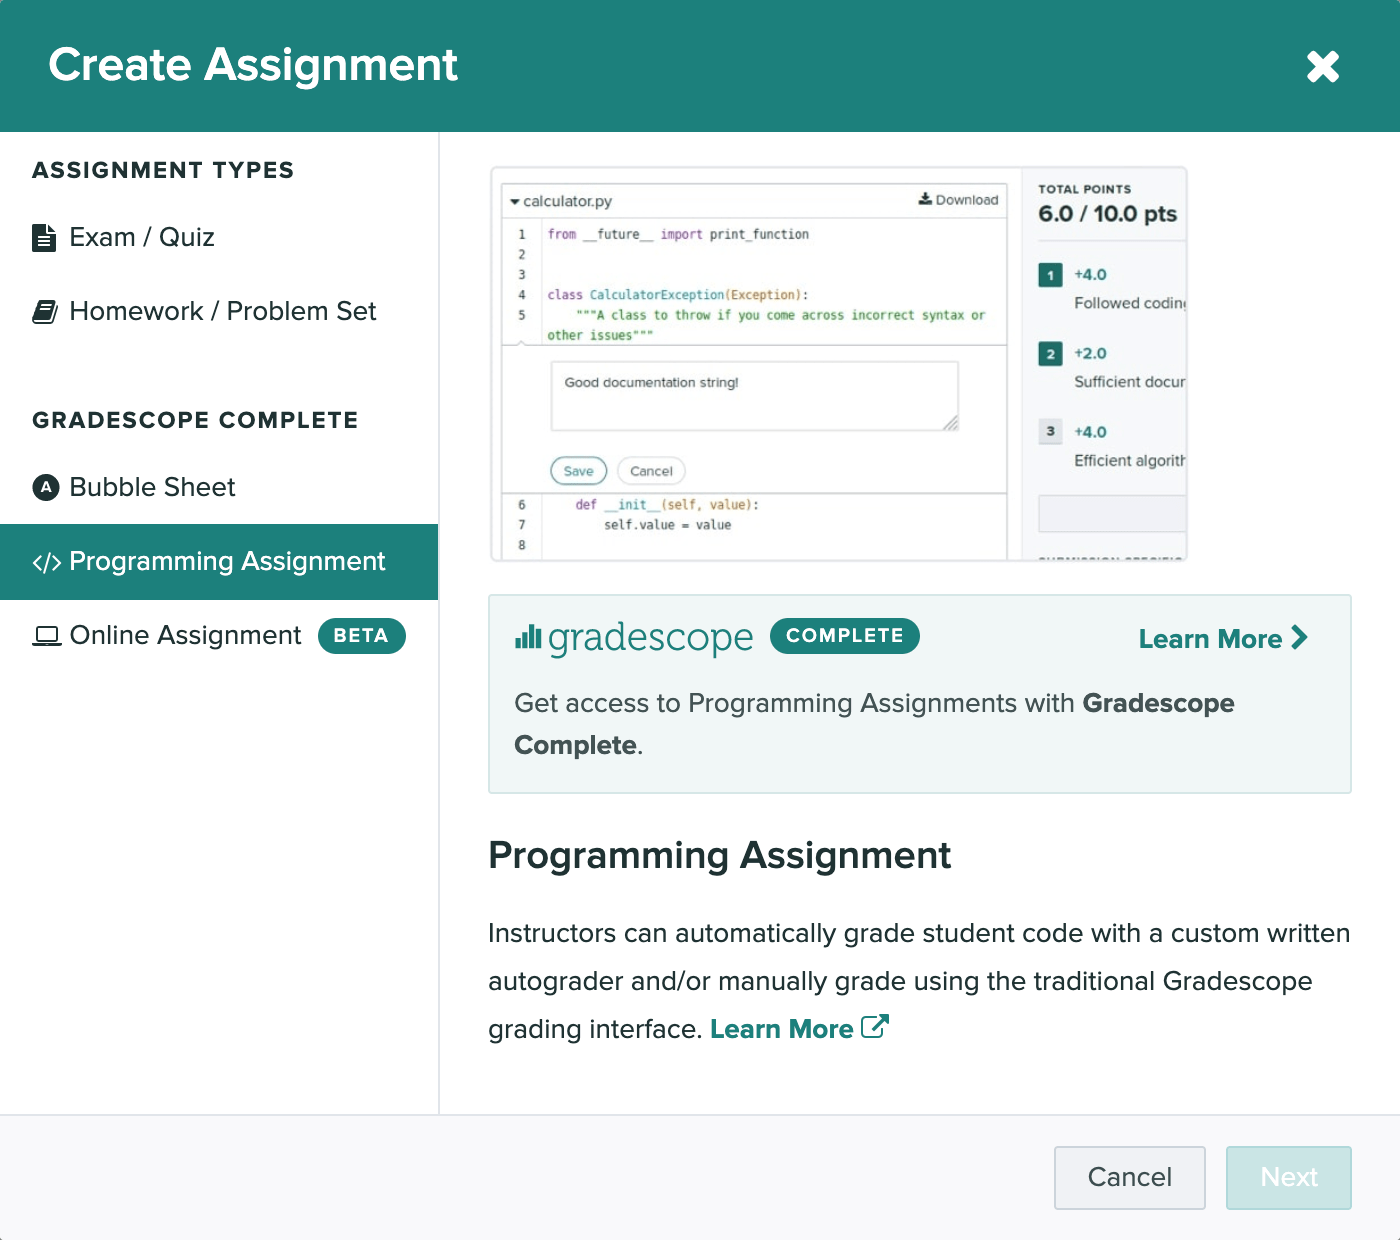
- To create a programming assignment, go to the course’s Assignments page and click Create Assignment in the bottom right of the page. Select “Programming Assignment” from the list of assignment types.
- Once the assignment is created, the workflow follows similar to other student submitted assignments:
- If you wish to manually grade questions, you’ll add them to the outline
- If you wish to use an autograder, you’ll set it up next
- Wait for submissions from students
- Optionally, manually grade student work
- Regardless of whether you’re using Autograding, Manual Grading, or a combination of the two, once submissions are in, you can download all students’ code submissions in bulk by selecting the Assignment > Review Grades (left side panel) > Export Submissions (lower right corner).
- In addition to exporting, when grading is completed you have access to the usual steps:
- Publish grades and email students
- Manage regrade requests
- See question and rubric-level statistics to better understand what your students have learned
Autograding
With Gradescope’s autograder platform, you have full flexibility in setting up whatever language, compilers, libraries, or other dependencies you need. You provide it with a setup script and an autograder script, along with whatever supporting code you need, and Gradescope manages accepting student submissions, running your autograder at scale, and distributing the results back to students and to you.
As an instructor, you can create a new programming assignment on Gradescope and upload your autograder zip file following Gradescope’s specifications. Your code produces output in the format that we request. Students submit to Gradescope and have their work evaluated on demand. They can submit as many times as they want and get results back as soon as the autograder finishes running. If you update your autograder after students have submitted, you can rerun it on all submissions at once from the assignment’s Manage Submissions page.

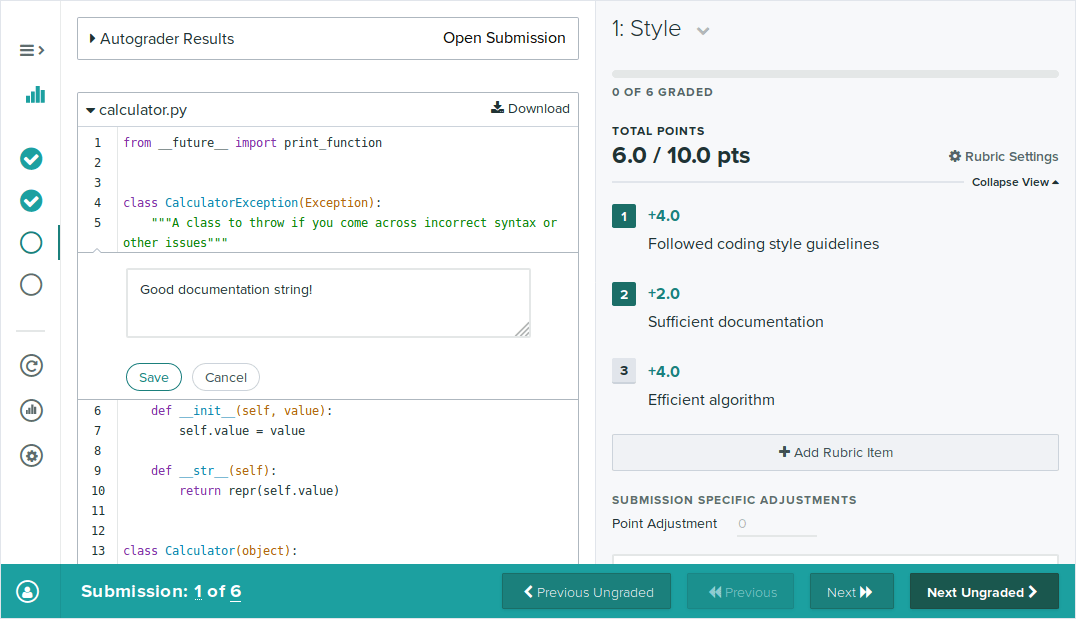
Manual Grading
You can also grade students’ code manually using the Gradescope grading interface. To enable manual grading, check the “Enable Manual Grading” box when creating a programming assignment. You can also enable this on the settings page for an existing assignment. Your students can then upload their code, and you can grade it from the Grade Submissions tab, using a rubric and in-line comments. Note that students won’t be able to see any scores or feedback from manual grading until you Publish Grades from the assignment’s Review Grades page.
If manual grading is enabled for a programming assignment, you can indicate one or more manually graded questions on the assignment’s Edit Outline page. You can have both autograded and manually graded components on one programming assignment, or you can skip the Configure Autograder step and only use manual grading to grade students’ code. Rerunning the autograder on any (or all) submissions will preserve any manual grading.
Code Similarity
In any Programming Assignment you can also use the Code Similarity tool, which will help determine commonalities among your students’ code. This tool does not automatically detect plagiarism but rather shows you how similar programming submissions are to one another. Code similarity is available for both autograded and manually graded assignments and for most programming languages. For more information on checking for similarity among your students’ submitted Programming Assignments, check out the full guide on Code Similarity.
For more information about programming assignments and autograders, check out the Programming Assignment Documentation.
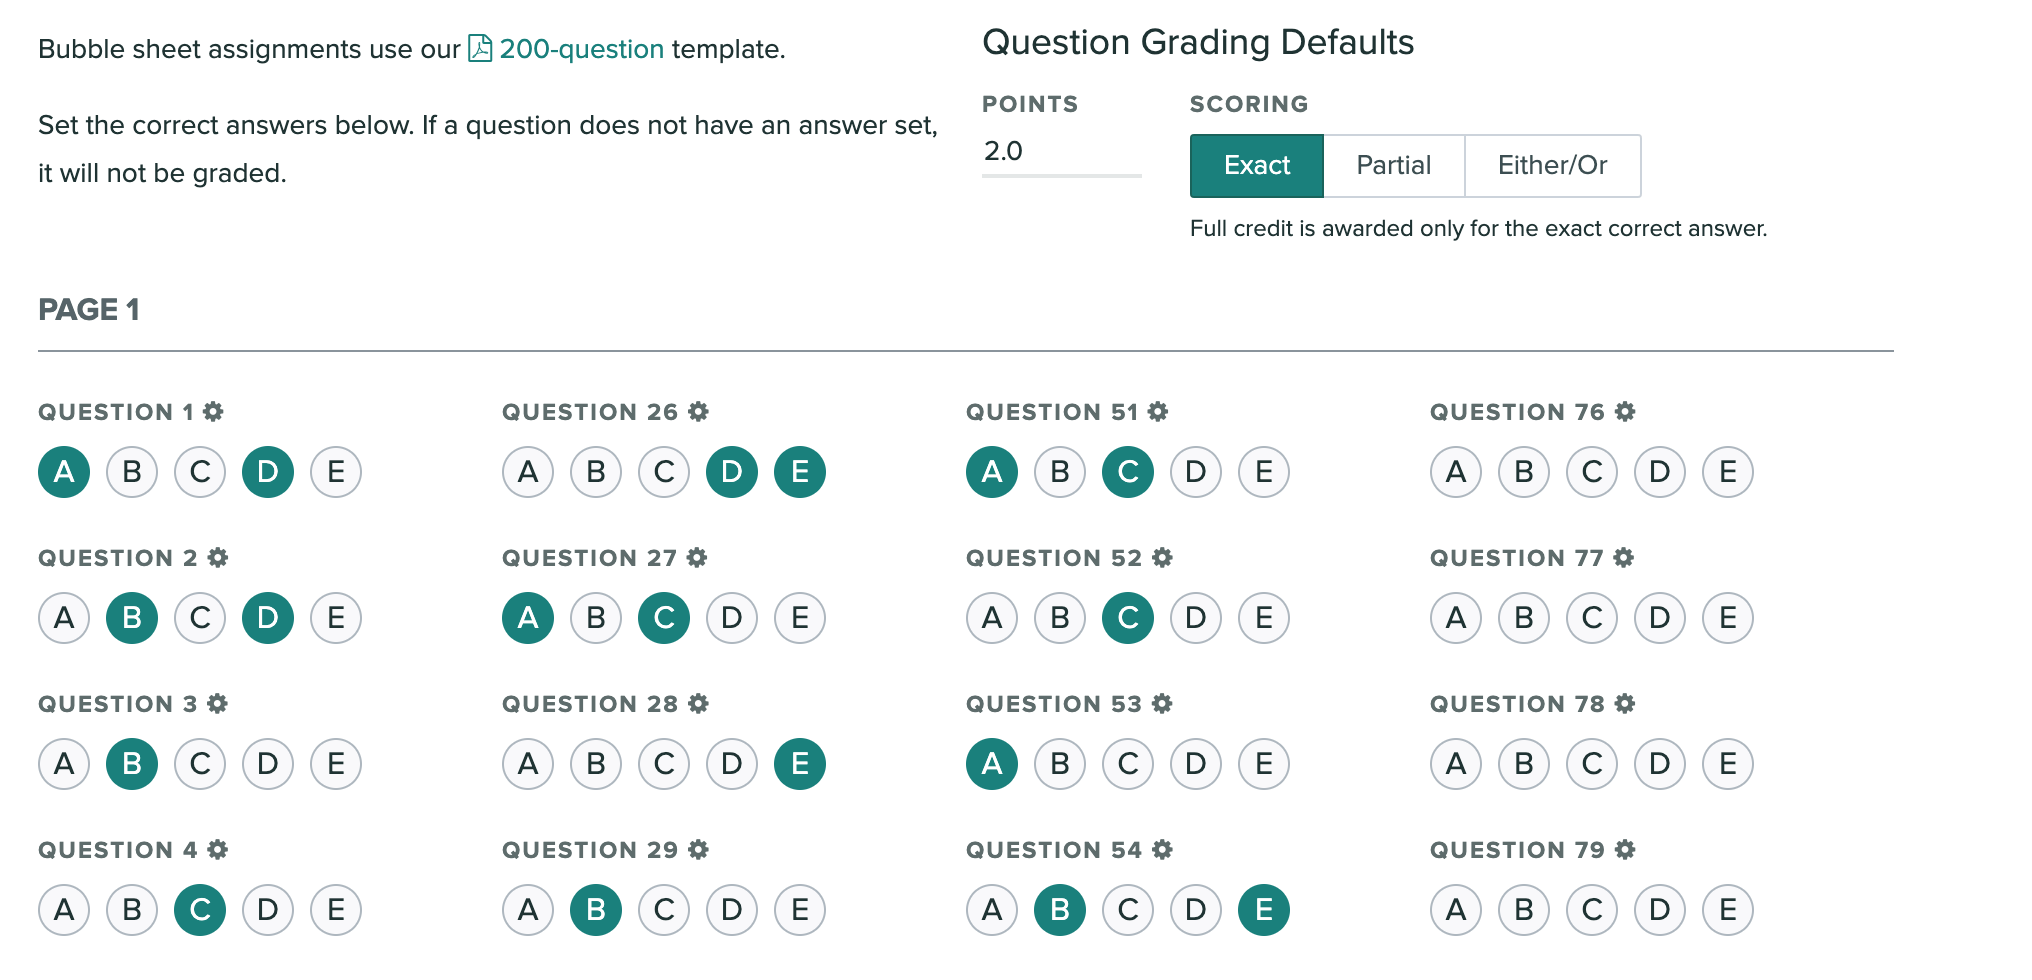
Create a Bubble Sheet Assignment
If your assignment is completely multiple choice, you should consider using the “Bubble Sheet” assignment type. With this type of assignment, you need to electronically or manually distribute and have students fill out the Gradescope Bubble Sheet Template. You can then mark the correct answers for each question ahead of time, and all student submissions will be automatically graded.
If you distribute and have students mark their answers on the Gradescope 200-question bubble sheet template, you can indicate the correct responses for each question ahead of time allowing Gradescope to automatically grade all student submissions for you as they’re uploaded.
If there are fewer than 200 questions on your multiple-choice assignment, simply use the first page of the Gradescope bubble sheet template and apply the same methods for indicating the answers in Gradescope ahead of time, uploading submissions, etc. Gradescope will only autograde questions where you previously marked the answers. Leave unneeded question and answer rows blank and Gradescope will ignore them when autograding submissions.
- Go to the course’s Assignments page and click Create Assignment in the bottom right of the page.
- Select Bubble Sheet from the list of assignment types.
- Give the assignment a title and select whether instructors or students will be uploading submissions. If you choose to let students upload the assignment, you will also need to choose the assignment release date, due date, and set your template visibility preference and group submission policy. Then, you will be taken to the Answer Key page.
- By default, the Bubble Sheet assignment type is set up for instructors to scan and upload. However, you can change this by choosing “Students” under Who will upload submissions? in your assignment settings and following the steps in the “Homework and Problem Sets” section above.
- If submissions will be student-uploaded, you can also enable Template Visibility in your assignment settings to let students download a blank, 200-question bubble sheet template from Gradescope when they open the assignment. If you enable template visibility on a Bubble Sheet assignment, please note that you will not need to upload a blank bubble sheet for students to be able to download it, and the template students can download will contain five answer bubbles per question, but no question content.
- If submissions will be student-uploaded, a handful of a setting to enforce a time limit will appear. By selecting “Enforce time limit” you’ll be able to use the Maximum Time Permitted feature to give students set number of minutes to submit their completed answer sheet from the moment they open the assignment and confirm that they are ready to begin.
- Keep in mind that if you’re administering a timed Bubble Sheet assignment, you should share Gradescope 200-question bubble sheet template with students ahead of time and instruct them to print it before they start their assignment timer. If you’d like to save students the trouble of completing, scanning, and uploading work under a time limit, you can always create an Online Assignment made up of all multiple-choice questions that students will answer directly in the Gradescope interface.
- On the Answer Key page, indicate the correct answer(s) for each question on your assignment. For questions with multiple selected bubbles, there are three grading styles to choose from:
- Exact – Full credit is awarded only for the exact correct answer.
- Partial – Partial credit is awarded for marking each correct letter. If any other letter is marked, the total score becomes 0.
- Either/Or – Full credit is awarded for marking any of the correct letters. If any other letter is marked, the total score becomes 0.
- You can indicate the number of points each question is worth at the top of the page. If you want any questions to have a different maximum point value or grading style than the default, you can customize these settings by clicking the icon next to the question number. Any questions you leave blank will not be graded.
- Once the assignment and answer key are created you’ll:
- Upload and process scans *
- Match student names to submissions *
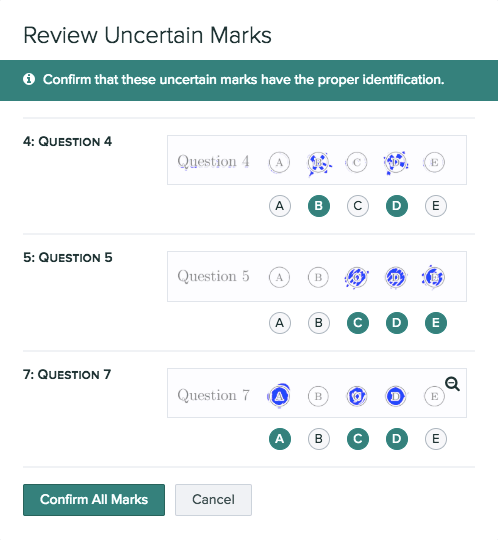
- Gradescope will start processing and grading the submissions as soon as they’re uploaded. This may take a few minutes. If some submissions are not graded, that is because our AI was not confident enough in the student answer. To review uncertain marks, click Uncertain Marks at the top of the Grade Submissions page or next to each question. You’ll see an image of the student’s answer and Gradescope’s proposed identification.
- If any of the suggestions are incorrect, click the correct bubbles. Click Confirm All Marks to grade all the submissions with uncertain marks.
- If any of the suggestions are incorrect, click the correct bubbles. Click Confirm All Marks to grade all the submissions with uncertain marks.
- If you’d like to award custom partial credit to certain answer options, give more detailed feedback for each option, or adjust the rubric in any way, you can do so by clicking on the question name on the Grade Submissions page.
- Any changes you make to the rubric for a given question will apply to all students who have that rubric item applied.
- And when grading is completed you have access to the usual steps:
- Publish grades and email students
- Export grades
- Manage regrade requests
- See question and rubric-level statistics to better understand what your students have learned
- There is also an additional analysis page for Bubble Sheet Assignments – Item Analysis. Gradescope calculates a discriminatory score, or the correlation between getting the question right and the overall assignment score.
For more information about specific features to Bubble Sheets check out the related Gradescope help center article.
*Not applicable if students are uploading their own work.
Create a Group Assignment
If Group Submissions are enabled, students will be able to add group members to their submission. You can set a limit for the maximum number of students that can be in a group. Students can add or edit group members at any time (even after the deadline), but you will always be able to see everyone’s full submission history. You can also add or delete group members by clicking on the submission from the Manage Submissions page and clicking the Group Members button in the bottom action bar.